Upcycling Closet Doors: How to Make DIY Life Size Nutcrackers

Looking to add a touch of festive magic to your home this holiday season?
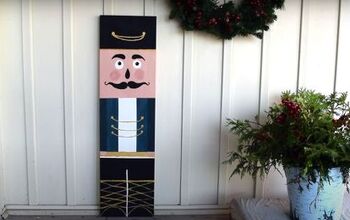
A DIY Life-Size Nutcracker is an eye-catching, fun project that will bring holiday charm to your porch or living room.
Using repurposed closet doors and a few basic materials, you can create your very own DIY giant nutcracker to welcome guests with holiday cheer.
This post was transcribed by a member of the Hometalk editorial team from the original HometalkTV episode.
Hometalk Recommends!
Tools and Materials
- Closet doors (or similar large flat surfaces)
- Sandpaper
- Primer
- Painter’s tape
- Acrylic paint (black, red, yellow, blue, white)
- Paintbrushes
- Felt sheets (yellow, gold, black)
- Gold chain (optional for added detail)
- Hot glue gun and glue sticks
Hometalk may receive a small affiliate commission from purchases made via Amazon links in this article but at no cost to you.
1. Prepare Your Closet Doors
First things first – grab those closet doors! Start by removing any hinges, handles, or hardware.
Sand each door to create a smooth surface and remove any old paint or finish. After sanding, wipe down the doors to ensure they’re clean and dust-free.
Once ready, apply a layer of primer to help the paint adhere better and create a solid base for vibrant holiday colors.
2. Tape Off Sections for the Nutcracker Design
Using painter’s tape, section off the areas you’ll paint in different colors.
To give your DIY nutcracker soldier that classic look, leave space at the top for the “hat” in black, the middle section for the “belt” and “buckle,” and the bottom portion for the boots.
Creating these boundaries will make the painting process easier and ensure clean, sharp lines.
3. Paint the Nutcracker’s Hat and Boots
Now it’s time to bring out the black acrylic paint. Paint the top section to form the nutcracker’s hat and the bottom section for the boots.
For a nice, even finish, add a second coat once the first has dried.
Make sure you let each coat dry completely before moving on to the next color. Patience here will give you a neat and professional finish!
4. Add the Belt and Buckle Details
Once the black paint is dry, focus on the middle area.
Paint a yellow stripe in the middle section to create the buckle.
For an extra touch, you can add gold chain detailing along the belt area, securing it with hot glue once the paint is completely dry.
This gives your DIY large nutcracker a festive, polished look.
5. Finish Painting the Jacket and Touch Up Details
Move to the top half of the door and paint this section red to resemble the nutcracker’s jacket.
Below the black boots, you can add a blue section for your soldiers pants.
Don’t forget to add shoelaces in white paint on the boots for added detail.
For all colors, add a second coat once dry and perform any necessary touch-ups to keep it looking crisp.
When the pants and shoes are dry stick on some white tape to separate the legs and feet.
Once the paint is dry to the touch, remove the tape.
6. Add Felt and Extra Decorations
Cut shapes out of felt sheets to create facial features, such as the eyes and mouth. Secure these to the face with hot glue. Add any other decorative details, such as yellow felt details on the top, to complete the look.
By gluing on the gold chain and felt accents, you’ll turn those doors into a giant nutcracker with authentic charm!
Looking for More Nutcracker Inspiration?
And just like that, you’ve created your very own oversized Nutcracker, sure to make a lasting impression wherever you display it.
This project is perfect for transforming plain doors into holiday statement pieces that will make your entryway or front porch shine.
Tell me how your DIY giant nutcracker turned out—leave a comment below! Plus, check out more nutcracker craft ideas for additional projects to try this season.
Enjoyed the project?
Comments
Join the conversation
-
 Ldr33438387
on Nov 27, 2024
I have to try this next year. The nutcrackers came out beautiful.
-
-
 Carolina's Art
on Nov 28, 2024
Adorable!!!
-








Frequently asked questions
Have a question about this project?