Wooden Bead Napkin Rings

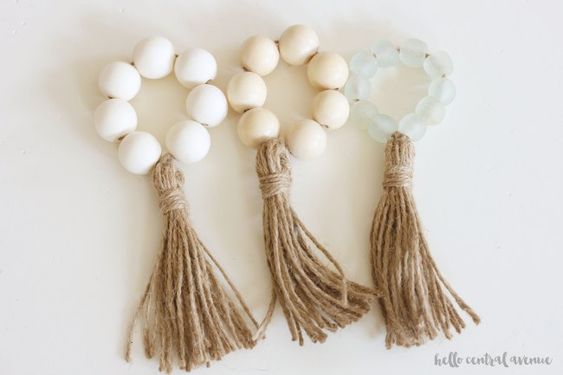
You can create a timeless look for your tablescape year round by making these DIY wooden bead napkin rings! The wooden bead napkin rings are super easy to make and add such a sweet touch to any tablescape!
Add a tassel with natural jute twine or colored baker's twine for a fun and unique touch! The wooden bead napkin rings work with any style, especially since you can switch out the beads for other colors, as well as, the twine that you use.
There are so many ways to put your own spin on the wooden bead napkin rings and so many wooden bead crafts you can make! For more easy DIY projects like my "Easy Hoop Wreath," head to my blog! Read on to find out how to make the napkin rings!
The materials needed are very minimal, but will create a big impact in your tablescape! You will need:
- Wooden beads 20mm
- Twine
- Scissors
- Upholstery needle (or a needle with a large eye)
- 4 inch wide piece of cardboard or other sturdy material
- Tape measure
Step 1:
First, using your tape measure, cut one piece of twine that is 20 inches long. This will be the piece of twine that you string your beads on. (If you plan to make several wooden bead napkin rings, you can go ahead and cut several 20 inch pieces.)
Step 2:
Next, in order to make the tassels, wrap your twine around the 4 inch piece of cardboard about 16 times. It does not have to be exact, but use the same number for all of your napkin rings so that they are consistent. The more you wrap the twine around the cardboard, the thicker the tassel will be in the end.
Step 3:
Slide the twine off of the cardboard keeping it in the same position so that it is in the shape of an "O." Then, cut the "O" in half at the top. This will leave you with a several pieces of twine in a bundle. This will become your tassel.
Step 4:
Then, string seven beads onto the 20 inch piece of twine. Place the beads in the center of the twine, so that you have an even amount of twine left of each side of the beads. At this point, tie the two pieces of twine together and then tie it again as seen in the image below. Make sure it is double-knotted.
Step 5:
Place the twine bundle, that will become your tassel, perpendicular to the long pieces of twine connected to the beads. Your twine bundle will be in the middle of the two long pieces of twine. Make sure the twine bundle is centered. Tie the two long pieces of twine around the twine bundle twice. Make sure it is double-knotted. At this time, the twine bundle should be connected to the the napkin ring.
Step 6:
Leaving the two long pieces of twine alone, pull each side of the twine bundle up so that both sides meet. Your two long pieces of twine should still be on either side of the bundle. Refer to the picture.
Step 7:
Finally, using one hand, take one long piece of twine and wrap it around the twine bundle in one direction. Leave a little bit of the twine hanging off so that you can tie it in a double knot. Now take the other long piece of twine and wrap it around the twine bundle in the opposite direction. Tie off the the two pieces in a double knot. This is the twine that is wrapped around the top of the tassels seen in the pictures. You can trim off any excess twine at this point.
More Thanksgiving Table Decor Ideas
To see the full tutorial and more DIY projects like this, head to my blog! If you feel like you need a little organizing in your life, check out my recent post, "Simplify Your Home the Easy Way" and grab a FREE 30 Day Checklist!
Enjoyed the project?

Comments
Join the conversation
-
 Bettybusby18
on Aug 28, 2019
Wow! A "must" for my table. Love your table settings. Thanks for sharing.
-
-





















Frequently asked questions
Have a question about this project?
Cute little gift.......something to put your ponytail in???