How to Make 5 Cute DIY Christmas Centerpieces

I am going to show you a few really simple, fun, and cute DIY Christmas centerpieces and vignettes. I'll show you some fun holiday-themed centerpieces that I like to make and how I style them up in vignettes as well.
So let's get started on these DIY snow-globe-inspired crafts!
This post was transcribed by a member of the Hometalk editorial team from the original HometalkTV episode.
Tools and materials
Hometalk may receive a small affiliate commission from purchases made via Amazon links in this article but at no cost to you.
DIY Christmas centerpieces
1. Christmas tree car scene
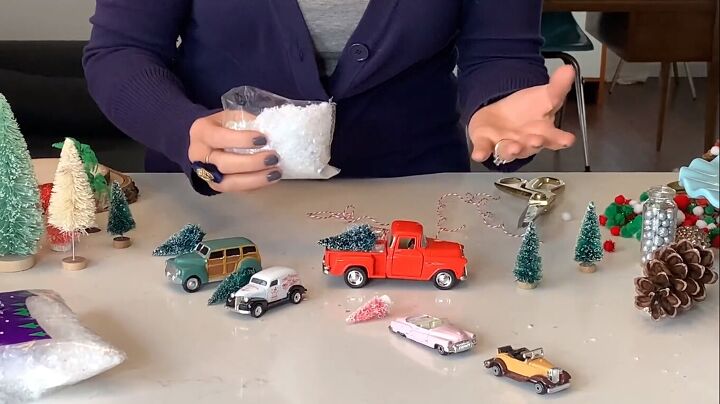
The first one is going to involve some toy cars, bottle brush trees, baker's twine, scissors, and a little bit of faux sparkly snow. We're going to create a snow-globe-inspired scene.
This is a vintage toy truck that I found on Amazon. I just want to kind of get the look that this truck just went to the Christmas tree farm and cut their tree down and they're bringing it home.
Place a Christmas tree on the back of the vehicle
So what I am going to do is get one of my bottle brush trees, pop it on the back of the truck, and add some faux snow.
You can also tie the Christmas tree to the back of the car or truck using baker's twine. Firmly tie the tree with a double knot to the car.
Add faux snow to the glassware
Okay, you can either choose to be done here if you don't want to put it into any glassware, but I highly recommend the glassware. That's what really makes it kind of more of a centerpiece. You can use a cloche, cookie jar - anything really.
Discover more DIY Christmas jar ideas and crafts here.
Place the truck or car in glassware
Then, place the car inside on the snow. I also added another Christmas tree. You can shuffle things around as you see it and add what you like.
You could also use a Mason jar...
...or even a glass bowl or cake stand.
2. Ornament cloche
Now this one involves plastic Christmas tree ornaments, which you can get anywhere. Plastic is better.
Simply fill up your glass cloche with ornaments. You might see a few that are kind of close in color. You can just easily shuffle them around.
Then, flip it over! I reuse this cloche for every season and fill it with whatever I like. I also spray-painted the base gold.
3. Wood slice scene
If you don't have glassware, it's no problem at all. I also love to find these little wood slices at my local craft store.
Similar to the first centerpiece, place some little ornaments, such as a little deer and Christmas tree, then top with faux snow. That's it.
4. Pine cone Christmas tree
This next idea uses pine cones. You can get them at a craft store or forage for them yourself.
Hot glue mini pom poms onto the pine cone so that it looks like a Christmas tree. It takes a little while to stick them all on, but it looks really effective.
I'm using traditional red, white, and green, but you can use whichever color scheme you like.
Here's one I made earlier. I spray-painted it gold and placed it inside a mason jar with some faux snow.
5. Christmas pick cloche
Finally, here's another super-simple DIY Christmas centerpiece idea. Grab a Christmas pick and place it up in the cloche. Add some faux snow to the base. Then place the cloche lid down. Easy!
How to style a Christmas vignette
I'm going to show you how I might style this. I usually start with my bigger one first. And then I always like to keep a couple of these wood slices around for really anything, bringing height into a centerpiece.
Vary in your heights on your different projects. You can layer things in and move things around as you see fit. I like to work in groups of three.
DIY Christmas centerpieces and vignettes
You have yourself a really cute centerpiece with these vintage cars, and everybody who sees them always compliments them and asks questions about them. So it's definitely kind of a conversation starter.
What's your holiday style? Are you more traditional? Are you more colorful? So let me know in the comments.
Enjoyed the project?











Frequently asked questions
Have a question about this project?