Upcycle Pallets to Build an Almost Free Vegetable and Herb Garden Bed

I wanted a raised garden bed in the backyard but wasn’t looking to spend a lot of money to build one. The lumber to build deep garden beds can cost quite a bit to build from scratch, but a friend had some old pallets that she was getting rid of and I knew I could upcycle them into a garden bed.
The old garden beds in the back corner of the yard were neglected and because the area became too shady over time from growing trees, the wood had rotted beyond usable condition. Nonetheless, the soil, some of the plants, and the pavers would be perfect additions to any new garden so I reclaimed as much as I could to keep costs down.
My daughter was so excited to help create this almost free garden in the backyard and we could not be happier with the result. Choose some favorite vegetables, herbs, and flowers and find pallets for this easy and rewarding backyard project!
You Will Need:
- Pallets (hunt for them for free)
- Jig saw to cut pallet openings
- Landscaping fabric and stakes or pegs
- Scrap 4x4 lumber (optional for extra planters)
- Garden soil and manure
- Seeds
- Border flowers
Step 1: Collect and Gather Wood
A friend gave me some pallets and I had 4x4s from an old playset that I included in my garden plan. You could use any scrap wood that you have at home and can hunt and ask around for a good place to find usable pallets.
Step 2: Create a Sketch and Map Out Garden
Once I collected my materials and knew what I had to work with, I sketched a plan for the garden. Decide what you want to grow in the garden and decide how much space to allocate to each item.
Step 3: Cut Pallets for Garden Bed
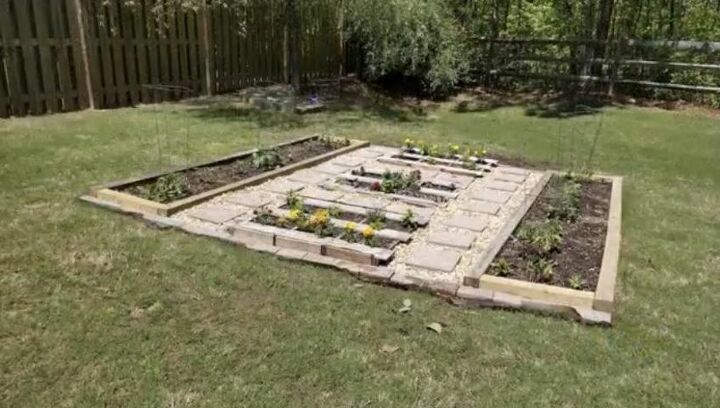
I used a jig saw to cut square openings in the pallet to plant inside and set aside the cut pieces. Pallets are ideal garden beds because they already have built-in rows! I cut three pallets to contain my vegetables and herbs.
Step 4: Enclose Pallet Sides
To keep my soil from spilling out of the side of the pallet garden beds, I used landscaping fabric to hold it in and secured it in place with the small pieces of pallet wood I had just cut.
Step 5: Build Border Garden Beds
I created two rectangular garden beds with the 4x4s from my old playset. I joined the 4x4s with brackets and decided to put one on each side of the three pallets in the center.
Step 6: Install Landscaping Fabric
I placed landscaping fabric in the area measured out for the garden and then made the border around the area with the 4x4 border planters. Landscaping fabric is great for preventing weeds and soil erosion from ruining a garden. Roll out and secure your landscaping fabric to the ground with garden staples, u-shaped nails, fabric pegs or garden stakes.
Step 7: Fill Pallets and Planters with Soil Mixture
I transported soil from the old garden and combined it with some garden manure in a wheelbarrow. Add the soil mixture to the pallet garden beds and the long planters. If you are planning to include any root vegetables, you’ll need a deeper area than for flowers or other vegetable varieties.
Step 8: Fill in Garden Paths with Sand and Crushed Stones
I already had sand and pebbles in my old garden and used a wheelbarrow to transport them to the new one. I filled in the walking areas of my garden with the stones and sand and leveled it. This is a great way to help control weed growth.
Step 9: Salvage and Wash Paver Stones and Bricks
I had paver stones and patio bricks in my old garden that just needed a good cleanup to be used in the new garden. I cleaned them with a pressure washer and made them look new. If you don’t have any laying around that you could use, you could skip this step or find some inexpensive pavers at a home improvement or hardware store.
Step 10: Line Border and Walkway with Bricks
I made a path in between the rows of my garden with the paver stones and then lined the garden border with the small bricks. They were useful not only for a border, but to secure the landscaping fabric in areas not held down with stakes.
Step 11: Plant Seeds, Herbs, Vegetables, and Flowers
In addition to seeds, I added tomatoes, peppers, cucumbers, herbs, and flowers. The small areas in the pallets are ideal natural borders for separating plants and flowers. Choose varieties that will add instant color and include late-blooming plants as well to ensure that there will be growth all season.
Step 12: Care for and Enjoy New Garden Beds
I added eggshells and fireplace ashes to areas of the garden that would benefit from the nourishment and fertilization they provide and made sure to water and weed consistently. With a combination of seeds, vegetable plants, and flowers, you will want to pay attention to the needs of each variety.
The effort I put into building my DIY pallet garden beds was so worth the beauty and the vegetables it provides! Reusing so much of the old garden materials saved us a great deal of money and I was glad to make use of the materials that had been wasted for so long. It is also special to see the wood from the kids’ playset back in use in the yard. Take the time to look around your backyard, shed, and garage for scrap wood, bricks, partially used bags of soil, or pavers and go hunting for some pallets!
Take a look at the before and after and see the incredible difference the garden makes in our backyard!
What tips do you have for repurposing or upcycling found materials into garden beds or have you used pallets to create a vegetable garden of your own? Share your ideas and get inspiration for ways to create a backyard garden without breaking the bank at Hometalk!
Enjoyed the project?
Resources for this project:
Comments
Join the conversation
-
 Doreen Kennedy
on Feb 03, 2021
Your gardens turned out really great. I love the layout. I wish I could use wood outside in my gardens. Unfortunately, the carpenter ants and termite populations in our area are too high.
-
 Ellis
on Feb 04, 2021
I have the same problem. Instead, I've used blocks left over from a low retaining wall project (one side is decorative, so that faces out); these are often on sale, check at a local supplier. If you want your garden bed a bit deeper, just stack the blocks using construction adhesive. Also, for an island bed, not raised, I found an edging product that's made of rubber (Rubberific, available in black, brown or gray, at Lowes), and you can shape it to your desired shape and just use included pegs to secure it to the ground. A bit pricey, but mine has been in place for about 10 years with no apparent wear. It's also easy to mow around.
-
-
-
 Doreen Kennedy
on Feb 04, 2021
Thanks for the tips. I did end up using old concrete books last year. It’s about the only material that won’t rot or get infested with termites and carpenter ants in the north east.
-














Frequently asked questions
Have a question about this project?
Im trying to start a prairie garden & incorporate native plants for pollinators. This may help me get going. One question. U put landscaping fabric under ur raised bed? Why?
Aren’t pallets treated with nasty chemicals that you wouldn’t want getting into the soil??