How To Build Arched Bookcases The Easy Way

How To Build Arched Bookcases The Easy Way
Add arched bookcases & shelves to your home easily with this simple method
Arch you glad you stumbled onto this easy build 😉
Hometalk Recommends!
How To Build Arched Bookcases The Easy Way
Add arched bookcases & shelves to your home easily with this simple method
Arch you glad you stumbled onto this easy build 😉
I’m sorry I couldn’t help myself, if you are new here don’t worry you will get used to it.
If you have been following along with us you know we are knee deep in our living room makeover & these arched bookcases are just phase 1!
I have been swooning over the arch shape for quite some time but the thought of actually building something with it scared me a little.
Which I now know was completely silly because it was a piece of cake y’all & it only required a few of my favorite HART Tools!
Let me show you what we were working with so you can have the complete picture:
Our living room is not a bad space, we just haven’t done much to it.
The previous owners added those cabinets & floating shelves which were fine but I pictured this space looking more grand, more oh la la!
You can find the design board for our living room project here!
I also needed to makeover this space on a serious budget, so no contractors, it was up to us!
Here is how we created beautiful built-in arched bookcases
Supplies:
- (8) Edge Glued Panels
- (3) 1x3x8 Pine Boards
- 1-1/2″ Screws & Nails
- Scrap 2×4 Blocks
- Wood Filler/Caulk
- Paint & Primer
Tools:
- Drill
- Measuring Tape
- Jigsaw
- Circular Saw
- Multi-Tool
- Level
- Stud Finder
- Sander ( shop vac attachment optional)
- Pencil/String
- Clamps
Process:
Our first step was to remove the floating shelves & cabinet top.
If you are not already starting with base cabinets like we are, you can buy stock cabinets from any home improvement store or build your own.
Next we used our Hart Multi-Tool to remove the molding from that space.
This little tool is one of my must haves, I have used for all our molding removal, window casing & door trim projects!
Building The Walls
First locate where the studs are on your wall & mark them with a pencil or chalk line.
We started the actual build by securing the two walls to each side of the cabinet.
In order to attach the first wall, I used a scrap piece of 2×4 screwed into a stud, so that the wall would have something to attach to.
The walls are edge glued panels.
We chose this type of wood because they were already the width & thickness we wanted & are easy to manipulate unlike huge sheets of plywood.
You can cut them to the proper length using a circular or miter saw.
Once they are cut to size, attach them to either the scrap 2x4s or directly into studs.
After the sides are up we measured & cut another panel for our new cabinet top.
Building The Arch
This is the part of this project that really scared me, but y’all it was so simple!
Here is all you have to do to get the perfect arch:
1. Measure your panel & cut it down to the width of the two outside walls.
2. Find the center of the board & insert a pin or tack at the bottom of that spot.
3. Tie a piece of string to the pin & the other end of the string to a pencil.
The string needs to be cut to the length you want the arch to be, for instance I held our string straight out & cut it 4 inches from the top of the board.
4. Use your pencil to draw the arch. Be careful to keep the pencil upright & the string taught.
You can check to see if you have an accurate arch by measuring the lines from end to end.
If they are the same measurement you did it!
5. Once you have the arch traced, use a jigsaw with a fine tooth blade to cut out the arch.
I swear I heard trumpets going off when our perfect arch was revealed!
6. Finally to complete the arch, I lightly sanded it with 220 grit sandpaper.
To attach the arch I used the same method as the side walls.
I used a nail gun to attach the arch to the built-in walls themselves, but added a scrap piece of 2×4 directly behind the archtop so that it would be secure there also.
So far so good!
Adding Shelves & Trim
Now it’s time to add shelving.
If you followed along with our cleaning closet makeover you know I like to attach shelves the easy way, using the ledge method.
Use 1×1 boards to create a ledge for the shelf to sit on, on all three sides.
Make sure the boards are level on the wall & with each other or your shelf will be a bit wonky.
Don’t worry, these ledges will be hidden with trim later!
After the ledges are in place, attach the shelf itself (say that 10 times fast) using nails going into the ledges from the top.
After the shelves are in, it’s trim time!
Start with the two side pieces running vertically on the wall.
I used 1×3 pine boards cut down to the length I needed.
Once the two side trim pieces are attached, measure & cut trim for the shelf fronts.
Attach theses with nails from the front of the trim.
Filling, Sanding, & Caulking
After I used wood filler to hide all the nail holes & seams I sanded the entire bookcase down with 220 grit sandpaper.
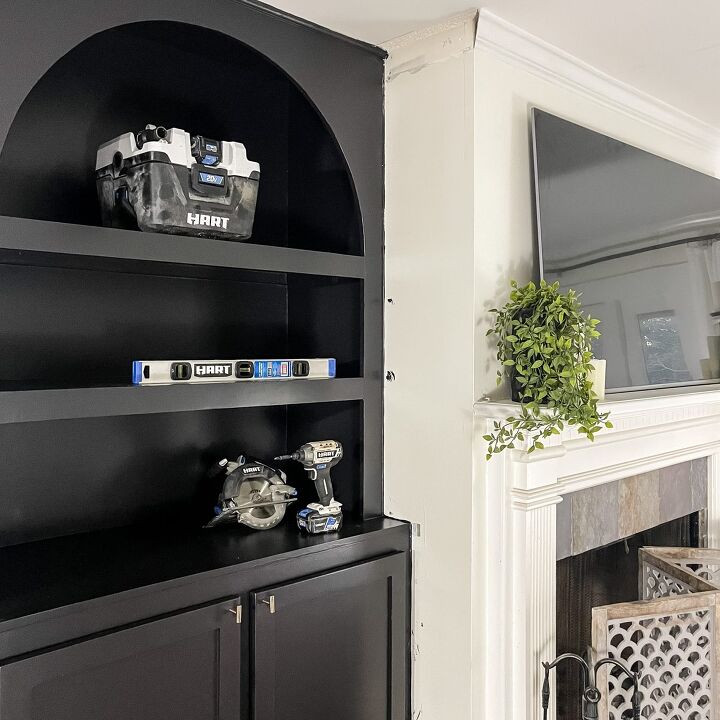
Because I obviously had to sand inside my HART ShopVac became the real MVP of this project.
It runs on a 20v battery so no need to lug an extension cord around!
The shop-vac saved me a bunch of time because I didn’t have to tape off or move anything, so if you don’t have one I suggest getting one ASAP!
After everything is all sanded & smooth, you can caulk all the gaps & seams.
Priming & Painting
Finally, it’s time to finish this project up!
This is the part of the project (besides cleanup) that I like the least…
But it has to be done, so I started by using my favorite primer to prime the entire built-in.
The label says it dries in an hour & it does, but I like to let it cure overnight before I start painting.
I alternated between a roller with a really small nap & a sponge roller to get the smoothest finish.
Looking back I should have had the primer tinted darker to make things easier on myself, but that’s not really my jam 😅
This color definitely is my jam though!
I wanted to go bold with this wall & Black Magic by Sherwin Williams hit the mark!
You can find my favorite black accent walls & rooms with color names here!
Finishing Touches
It’s the little details that really button up a project!
For a little extra glam we installed these gold knobs onto the cabinet doors.
This was super simple, we simply marked where we wanted the knobs to go & drilled holes just big enough for the knob screws to fit through.
They were less than $5 each & just enough of an accent.
Styling these shelves will be so much fun!
I’d like to mix in some DIY decor projects like these textured vases, antiqued books, some pretty artwork, & of course family photos!
Next up on the living room makeover list is to add brick to the fireplace & build a new mantel!
You can follow along with this makeover on Instagram or see all the projects here
Let me know what you think & if you HART our new arched additions as much as I do!
Enjoyed the project?
Resources for this project:
See all materials
Comments
Join the conversation
-
 Debbie Westgate- Guyot-Sliwa
on Dec 14, 2024
With the arches left after cutting you can add feet and make a cute riser! I also find ways to use leftovers, not trash anything!
-
-









Frequently asked questions
Have a question about this project?
What color is that paint?
Ack, the product placement overkill one again?
Ok I guess. Wood looks skimpy/cheap, perhaps a thicker piece of plywood to give a presence. Color does no favors to look. Recedes into space and looks like two black holes in wall. Definitely needs crown to match existing. But not bad idea. Maybe lighting on shelving?