How to Build a DIY Cabinet - Perfect For Vinyl Records

Ever found yourself with a collection of cool old records and no place to store them? Fear not! In this step-by-step tutorial, I'll guide you through creating a stylish DIY cabinet to showcase your vinyl treasures.
Tools and materials
- 3/4” Birch Plywood
- Paint in Sherwin Williams Tricorn Black
- 1/2" Dowels
- Shaker Cabinet Doors
- Gold Mid-Century Modern Style Legs
- Wood Glue
- Saw
- Paintbrush or roller
- Screwdriver
- Measuring tape
Table of contents
Step 1: Gather Your Materials
Collect all the materials you need, including 3/4” birch plywood, Sherwood Williams Tricorn Black paint, 1/2" dowels, shaker cabinet doors, gold mid-century modern style legs, wood glue, a saw, a paintbrush or roller, a screwdriver, and a measuring tape.
Step 2: Frame Construction
Using the 3/4” birch plywood, construct the frame of your cabinet. Measure and cut the plywood to your desired dimensions, ensuring stability and strength. This will serve as the foundation for your cabinet.
Step 3: Paint the Frame
Apply the Sherwin Williams Tricorn Black paint to the birch plywood frame. This sleek color will add a touch of sophistication to your DIY cabinet. Allow the paint to dry completely before moving on to the next step.
Step 4: Add Dowels for a Fluted Look
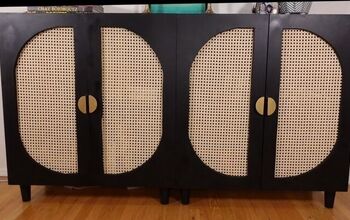
To create visual interest, attach 1/2" dowels to the inside of the shaker cabinet doors. This simple addition will give your cabinet a unique and fluted appearance, adding a touch of creativity to the design. Paint the doors and dowels to match the cabinet frame.
Attach the modified shaker cabinet doors to the frame using wood glue and a screwdriver. Make sure they are securely in place, creating accessible storage for your records while maintaining a stylish aesthetic.
Step 5: Attach Gold Mid Century Modern Style Legs
Elevate your cabinet by adding gold mid-century modern-style legs. This not only enhances the overall look but also provides a touch of vintage flair. Secure the legs to the bottom of the frame, ensuring they are evenly distributed for stability.
DIY cabinet
Once all the elements are in place, take a step back and admire your DIY cabinet. Your DIY cabinet is not only functional but also a stylish addition to your space. If you create this cabinet, share photos of your project in the comments below.
Follow @a_bit_unexpected_diy on TikTok for more DIY ideas.












Frequently asked questions
Have a question about this project?