Up Your Home’s Curb Appeal With These Half Hour Cedar Shutters

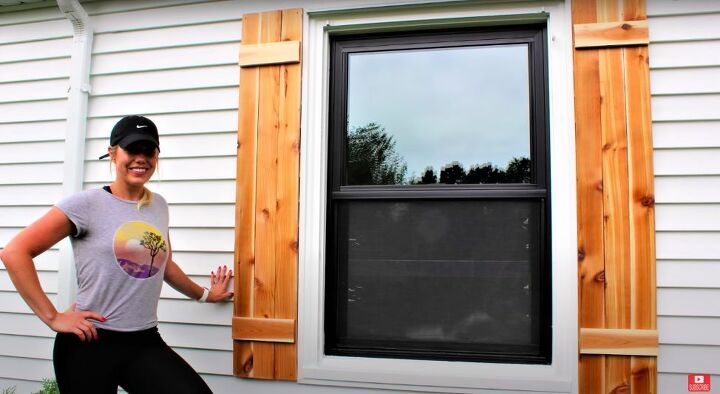
Curb appeal is a quick way to up the value of your home. These 30-minute cedar shutters are a great addition to your windows and will have passersby gawking in amazement! I used cedar in this project to match the pillars and portico at the entrance to the house. The contrast of the natural wood on a white background adds an inviting element to the entrance of my home. I have seen this project done in a multitude of colors, just make sure that whatever color you choose, it complements your home’s exterior.
Tools and Materials:
● Three 1”x4” x 10ft cedar boards (you may need a different size depending on your windows)
● One 1”x4” x 4ft cedar board
● 1 ¼” trim head screws
● Wood glue
● Sanding block
● Waterproofer
● Miter saw
● Protective gear
Before you buy anything, you need to measure the height of your window. My windows are 60” tall, so I made 60” shutters, but the size you need may vary. Measure from the top edge to the bottom edge of the window casing, not just the window itself.
Once I had all the lumber, I needed to cut it to the correct size. For my windows I cut four pieces 10 ½” long and six pieces 60” long. Of course, if your window is a different size you’ll need to adjust accordingly. The six pieces that I cut to 60” were to match my window height, so make sure to cut these pieces according to the height of your window.
Now that I had the lumber cut to size, I was ready to start assembling my shutters. I lay out all the pieces to make sure I had everything I needed.
I took two of the 10 ½” pieces and put wood glue on one side of each piece. Make sure to put enough glue to hold everything together, but not so much as to have it oozing out when you glue the pieces together.
Next, I took one of the longer pieces of wood and placed it across the ends of the 10 ½” pieces. I made sure that there was a 6” overhang on either end of the long piece of wood. Ensure that the side of the 60” piece is flush with the side of the 10 ½” piece, as we’ll be adding two more long pieces next to it.
Using trim head screws, I secured the longer pieces to the shorter pieces. I used four screws for each board and for each end, for a total of 24 screws. Being a perfectionist, I made sure that each screw was evenly spaced, however this side of the shutter will be against the outer wall of your house, so if it’s not perfect don’t stress.
Here’s Henry exhibiting how this shutter doubles as a surfboard!
Repeat steps three and four to create another identical shutter for the opposite side of the window. Double check that you leave a six-inch overhang, as you want them to look even when they are hung across from each other.
Lightly sand the entire piece with a sanding block. Make sure that you get a smooth, even surface. I like to use a sanding block because I find it easier to sand edges and corners, though if you only have sandpaper that can work as well.
Once the shutters were sanded and smooth, I sprayed both sides with an even coat of waterproofer and left them to dry. Because these will be on the outside of my house, it’s imperative that they be able to stand up to all kinds of weather conditions, which of course includes rain. By waterproofing them I ensured that they will last for years to come. It’s also super easy to waterproof using a spray waterproofer. Make sure to wear the proper protective gear, as you don’t want to be inhaling these fumes. If you wanted to paint your shutters, you should do so before waterproofing. I chose not to paint my shutters because I love the look of the beautiful cedar wood against the white exterior of my house.
Now these beautiful cedar shutters are ready to be installed! Your home exterior will determine how they need to be hung, so make sure to do your research before you hang them up.
Aren’t they beautiful? This quick, cheap project majorly upped the curb appeal of this house! You don’t need to spend thousands of dollars on upscale landscaping or major overhauls, simple additions can make your house look like a million bucks! What have you done to increase the curb appeal of your house? Let me know in the comments down below!
Enjoyed the project?
Resources for this project:
See all materialsComments
Join the conversation
-
 Phyllis Wolper
on May 28, 2022
I did this project and it has made a huge difference. (When I say "I", I mean my handyman Craig. He builds, I paint or stain. Man won't touch a paintbrush!
-
-
 Peggy L Burnette
on Apr 24, 2023
Looks Great, and Henry is adorable.
-
-

















Frequently asked questions
Have a question about this project?
Why did you put the crosspiece facing the street? Wouldn't it look better if it was not showing?
You know real cedar is waterproof and insect resistant already right? What kind of spray waterproofer did you use?
just for other people reading this if you want a wider board than 1x4 I used the dog eared fence boards for mine they are almost 6” wide and are already treated. You can sand them smooth and stain them cedar color or paint them to match your trim
This question might be lame, but here goes: It appears in the last photo that your roof shingles are a lavender color. Is that true, or an effect of the light that day?
I LOVE your shutters and the new curb appeal of your house. Your instructions are thorough and detailed.
Thank you!