Wicker Rocker Resurrected

by
Barbara Stanley
(IC: homeowner)
8 Materials
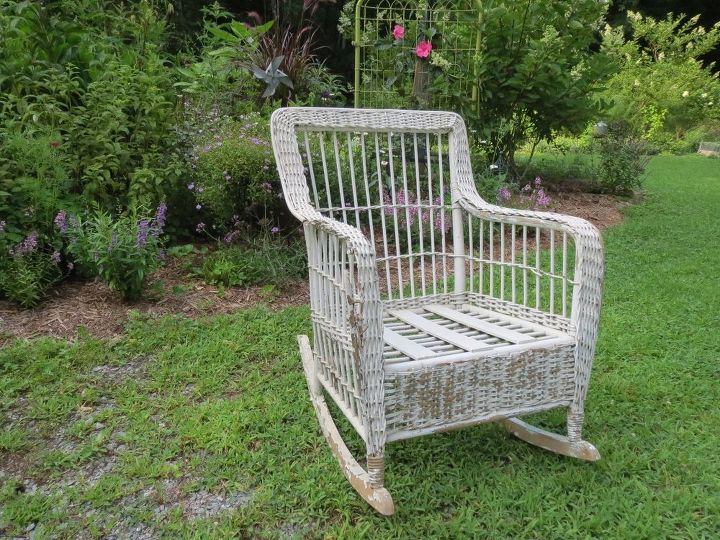
This wicker rocker had seen better days, and seemed destined for the garden to become a planter. I got it for $10 at a thrift store and lugged it home to join my other flea-market garden planters. After realizing how sturdy it was and falling in love with the vintage vibe, I couldn't bring myself to relegate it to the disintegration that would be inevitable outdoors as a planter so I decided to try to return it to life as... a rocking chair, of all things!
I cleaned up the flaking paint on the wicker with a wire brush and used sandpaper to smooth the wooden rockers.
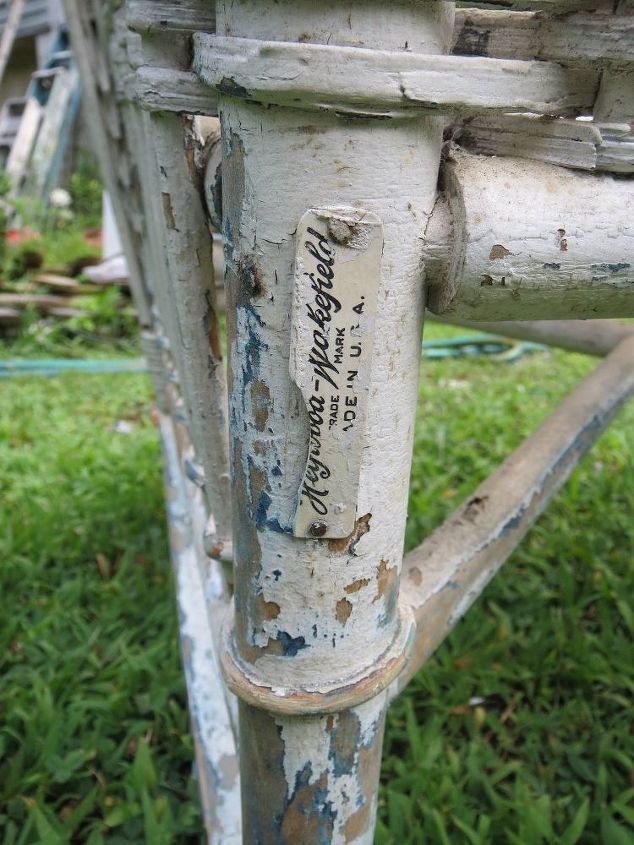
While cleaning it up, I saw the Heywood-Wakefield label, a company well-known for quality antique wicker furniture. That convinced me even more that I wanted to save this chair.
The arm was badly damaged. I am not a wicker repair expert and didn't want to spend the big bucks to have it professionally repaired. I just wanted to make it a lovely piece that I could use in my potting shed for some relaxation at the end of the day.
I had some scrap copper pipe about the right size to make a replacement for the missing outside edge, so used a tubing cutter to cut it to the right length. I bent it to approximately the same curve as the arm.
Using e-6000 glue, I attached the inserted the broken ends of the wicker arm into the hollow ends of the tubing. I taped the tubing to the framework and let it dry for 24 hours.
Still a pretty ugly repair, huh?!
A coat of white latex primer and a couple of coats of Krylon Ballet Slipper pink paint, and it's starting to look better!
Now, to cover up that ugly broken arm! I had some old and faded Rachel Ashwell Shabby Chic rosebud sheets that I had saved after we bought new ones for the bed. I tore a piece of the sheet into about 1" wide strips and wrapped them around the arms, tying the strips at each end to the wicker frame.
To make the fabric more moisture resistant so I could put it outdoors on occasion, I sprayed the strips with several coats of clear acrylic.
A bit of a vintage lace scrap for trim to cover the broken seat edge, a pillow for the seat, and a vintage flour sack pillowcase tied on the back with ribbons = pure bliss for a comfy spot to relax, have a cup of tea, and read my garden magazines!
Enjoyed the project?
Suggested materials:
- Antique Heywood-Wakefield wicker rocker (thrift store)
- Sandpaper, wire brush (hardware store)
- Copper tubing (saved from another project, found in my junk stash!)
- Tubing cutter (hardware store)
- E-6000 glue (Walmart)
- Rachel Ashwell sheets, pillow sham (Target)
- Vintage flour sack pillowcase, lace trim (thrift store)
- Krylon white latex primer, Ballet Slipper pink, and Maxx clear acrylic spray paints (Walmart)
Published September 24th, 2016 10:15 PM
Comments
Join the conversation
3 of 294 comments
-
 Kate Walsh
on Jun 25, 2019
sooooo pretty a fantastic way to restore worn edges with fabric watch this space thankyou so much for inspirational tips
-
-
 Jill Mitchell Rice Browne
on Jan 01, 2021
you are very creative and handy and the remake is lovely. Great find
-
 Barbara Stanley
on Jan 01, 2021
Thank you! I am still enjoying it in my potting shed.
-
-











Frequently asked questions
Have a question about this project?
I have a settee that the back has disintegrated how would I fix it to make it as awesome as yours?
I love love this I recently purchased two old wicker chairs. I am going to try to repair them. If it does not come out right I will copy u. Also I have looked and looked at pics. of cushions for wicker. I did not like anything until I saw this. I am going to copy this. Do you think this would go okay in a living room shabby chic style? Thanks for taking the time to post If it were not for people like you my home would not look as it does today. I am not creative but I have good taste. When I see good taste I know it. I hope I can make mine turn out as beautiful as yours. Could you tell me what you stuffed the seat cushion with?