Antique Dresser Makeover

I've had this dresser/ side board whatever you want to call it for quite a while now and finally got around to refinishing it and bringing it back to life.
Best wood filler!
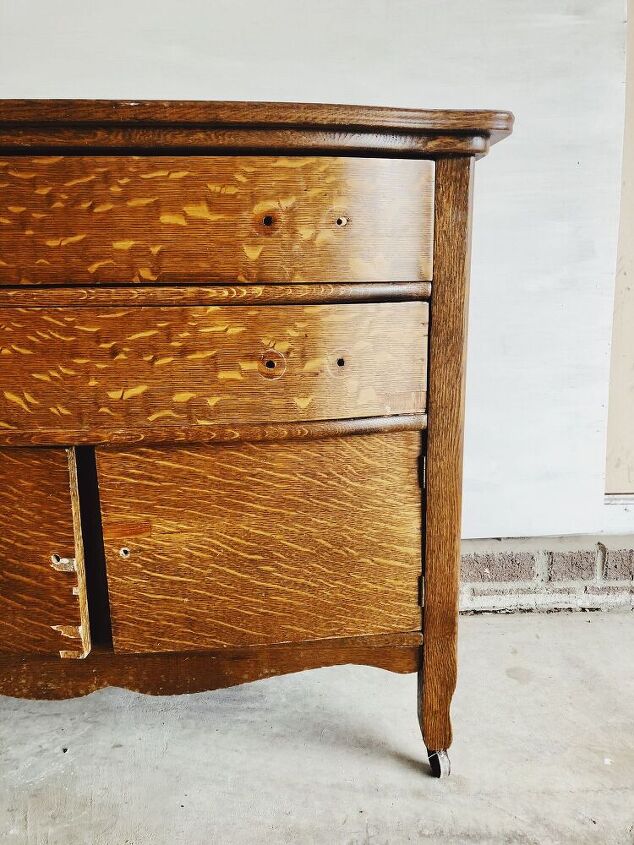
This is the before. The drawers and cabinet doors were covered in veneer - my least favorite thing.
Step One - Remove Veneer
I've had great luck removing veneer in the past and knew I wanted to do that with this piece. The veneer on the doors was already chipping and had some sort of water damage so big piece of the veneer were no longer in tack. To remove the veneer I use a putty knife and a blow dryer or heat gun to chisel it off. Now this process can be quite lengthy and feel like it's never going to end. I originally started this piece over a year ago. Getting all the veneer off was exhausting and I just got burnt out. I eventually got it all off and was determined to finish it.
This is how to drawers looked after all the veneer was taken off and then sanded down, which brings me to step two - sand.
I sanded down this entire piece. I used 80 grit to get off the existing stain and then finished with 120 to make sure it was nice and smooth.
The wood underneath where the veneer once was was not in the best condition. Putting veneer over cheaper, not the best quality of wood is very common, so I wasn't that surprised. I knew I didn't want to paint this entire piece so I used some stainable wood filler to smooth out the wood.
Step Three - Wood Fill cracks and imperfections
As you can see there was a lot to fill in.
I'm going to throw in a additional step to this that will completely depend on the piece. The cabinet doors to this piece were in rough shape. After removing the veneer there was cracks almost completely going through the wood. I used wood glue and made sure there was no more cracks.
Step Four - Paint
While the wood filler dried I painted certain parts of the dresser. This is after the first coat.
The first coat of paint is always scary!
Step Five - Sand (again)
After the wood filler was dry I sanded it down by hand with 80 grit and then went over it with 120.
I wanted this piece to have a lighter color stain so I picked some new ones up. While purchasing new stain I also found this blend-Fil pencil. Since I had filled in so much on the drawers and cabinet doors with wood filler, I wasn't expecting the stain to completely adhere to it I decided to pick this pencil up in hopes it would help blend the stain and wood filler together.
This photo shows left completely natural and right a trial of the stain adhering to the wood filler and on that door wood glue.
Even after using the pencil I wasn't happy with the way the doors looked. I knew it was going to be a complete eye sore, but I also didn't want to just simply paint over it. I had spend so, so much time getting the veneer off. If I was originally going to paint I would have just fixed the veneer to be able to paint over top it. Then I had an idea! I stenciled my fire place a couple years back and still had the stencil laying around. I decided to stencil over the stained piece in hopes that it would disguise the wood filled part that did not take to the stain.
Step Six - Stain
I stained the cabinet doors, drawers, top and some trim pieces. I used Natural by Minwax.
Step Seven - Stencil
If you want a more in depth how to stencil check out my fireplace redo
https://www.hometalk.com/diy/living-room/fireplaces-mantels/faux-tile-fireplace-make-over-43457501
oh yes!
Step Eight - Seal
After stenciling everything I went over everything, paint included with my go to polycrylic in matte finish. The top was sealed at least three times for optimal protection.
Step Nine - Add Hardware and Enjoy!
I love how this piece turned out. It's so unique and different. This piece was listed for only a day before it sold and I am so happy it found a new home where it can be enjoyed.
The paint color on this piece is Sable Calm by Valspar and the stain is Natural by Minwax. Pulls are original and knobs are new.
I did line the drawers to this piece. I use contact paper I find at Walmart!
Enjoyed the project?
Resources for this project:
See all materialsComments
Join the conversation
-
 Judith DeMello
on Feb 13, 2024
You did a beautiful transformation! Thanks for sharing
-
-












Frequently asked questions
Have a question about this project?
You pulled off all of the beautiful tiger oak veneer? The oak/pine/poplar whatever was under it has that unfinished industrial rustic look, doesn't it.
Ashleigh, in spite of all the naysayers here that are determined to denigrate your work and creativity, I think it is gorgeous and would be proud to have this piece in my house, without tiring of the stenciling. You go girl!
Absolutely gorgeous!