DIY Faux Barn Door Room Divider

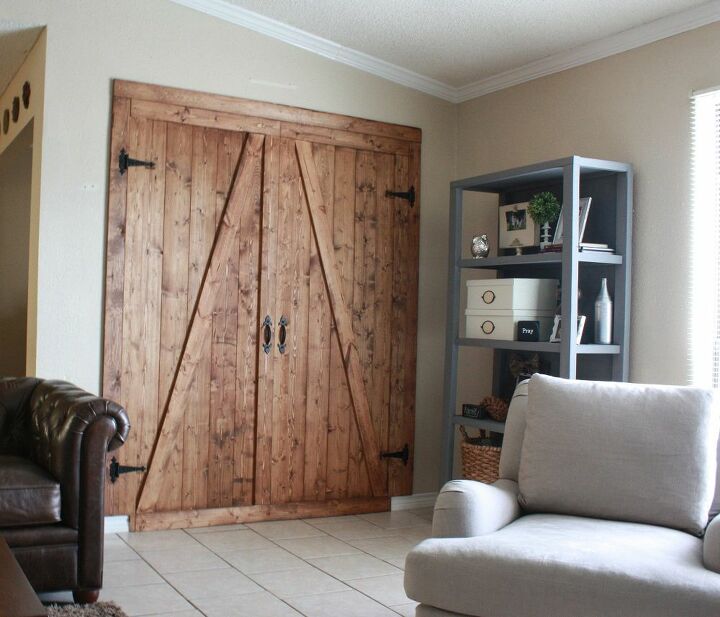
Have you ever rented a house or apartment and had something bother you so bad about the layout, but yet you couldn't do anything about it because, well it wasn't yours? Or you own your home, but you aren't sure you are ready for a large renovation project? This happened to me in our last house with an odd opening that I disliked, but I came up with this removable solution to save my sanity while we lived there! Maybe it can help you too! This DIY Barn Door Room Divider is a faux door but looks like the real deal!
It really completes this space! Do you want to see this space before the faux door?
I wish I would have taken it from the same spot so you could really see how it broke the space up and distracted the eye! 
The greatest part about it was that it was inexpensive and easy to do with only a few tools!
Alright, lets walk through how to build a barn door...that isn't actually a barn door! Lol!
If you need more in depth help, you can always refer to the original post on my blog! DIY Barn Door Room Divider
Step 1:
Cut the 1x6 boards down to size for your opening.
Step 2:
Drill pocket holes on the back of the boards to attach them all together like one large plank of wood.
I don't know if you can tell all the little holes drilled in the boards or not...but there are a ton of them! See the post on my blog (linked above) if you aren't sure how to use a Kreg Jig, as I give an in depth step by step tutorial on how to use the Kreg Jig R3 to do this project!
Step 3:
Sand the boards edges to give them definition between each board!
Step 4:
Actually attach all the 1x6s together with wood glue and screws.
Step 5:
You may want to grab a helper at this point if yours is as large as mine was! Stand the 1x6s (all attached) upright. Use a laser level to align the top 1x4 no matter how off the boards are behind it, you won't see them! Clamp the 1x4 (without cutting it down to size yet) to the 1x6s.
Step 6:
Measure and cut the 1x4s that are going to be the 'sideboards'.
Step 7:
Since it was a rental, I was not allowed to remove the baseboards, so I had to cut my boards out to allow them to go around the baseboards. If it was my own home, I would cut the baseboards back! When you attach the 1x4s on the sides and the top, you will leave an over hang over the 1x6s...they will be what you screw into the wall to attach it!
Step 8:
Once the sideboards were in place, I was able to cut the bottom 1x4 to fit inside the sideboards.
I attached the 1x4s with wood glue and screws from the backside of the 1x6s so you didn't see any screw heads.
Step 9:
Now remember that top board that we clamped? Well now we can measure from the 1x4 on the left to the 1x4 on the right to see what the size is it needs cut down to. Cut the board down to size. Before attaching though, I cut it in half so it gave the illusion on two doors that open down the middle. I couldn't find a picture of this step though!
Step 10:
Once I had the top 1x4 secured into place, I measured for the two middle boards. I cut and attached them.
Step 11:
I cut the diagonal boards. I just laid them up against the door and marked where I needed to cut. Then drew the line across it and created a guide with a scrap piece of wood. I cut it with my jigsaw.
Step 12:
Attach the diagonal boards.
Step 13:
Sand everything and finish how you would like!
Step 14:
Cut the frame boards. The top frame board will be the longest and the side frame boards will fit under it!
Step 15:
Attach the door and frame boards to the wall.
Step 16:
Add your hardware to make them look amazing...and real! Lol!
It is complete! Now head to the blog to see what I created on the backside of the door! You know I couldn't waste that space! Ooh and take a look at the blog post to see them all dressed up for Christmas!
Hope this helps you tackle something that has been bothering you in your home, whether it's a rental or your own home! We have to enjoy the home we are in no matter what the circumstance, so we may as well do what we can to make it someplace we love!
Happy Building!
Cara
Enjoyed the project?
Resources for this project:
See all materials
Comments
Join the conversation
-
 34354174
on Aug 20, 2020
This is an older post from over a year ago and some were not a fan of the barn door. I have never been a fan either, although she did a beautiful job.
These same doors could have been made to look different by not putting the A shaped boards across and using different hardware. Paint the doors white or a complimenting color to the, what looks like, the living room.
Another option for this would be to build shelves for small decorative items on the outside and then the chalk board for the play room. Easy to disassemble when you move.
-
-












Frequently asked questions
Have a question about this project?
So this "door" doesn't open? Did you get the kid out before installation? It looks great though!
What stain is this please!!!
Agree with above... how does it open? Not understanding how you get into the room. Not understanding how you attach the boards together either.