Modern Baseboard Heater Cover

Sarah
by Sarah
4 Materials
$60
2 Hours
Easy
know, I know. Older homes have charm. They also have lots of old, dated things that can be a challenge to update. Baseboard heaters happen to be one of those things. My baseboard heater covers in this guest room were old, rusty, and super dented. Unfortunately, replacing them can be difficult and costly. So I came up with this modern baseboard heater cover that is actually quite easy to put together!

Disclaimer: In the name of full transparency, please be aware that this blog post may contain affiliate links and any purchases made through such links will result in a small commission for me (at no extra cost for you). As an Amazon and Home Depot Associate I earn from qualifying purchases.

Length of time for project: 2-4 hours for assembly. Finish time 1-2 hours.

Cost: ~$60 (keep in mind, my baseboard heater cover is about 20′ long. The shorter the cover, the less material needed)

What you’ll need: For this 20′ beast I used #11 primed 8′ 1×2 boards and #3 8′ 1×4 boards. I attached some pieces with a kreg jig and the others with my nail gun.

What I learned: You can attach the braces to studs using pocket holes. Who knew?! Also, paint your brackets and slats before attaching. I’m so impatient that I never do anything in the correct order. But painting first would definitely be easier.


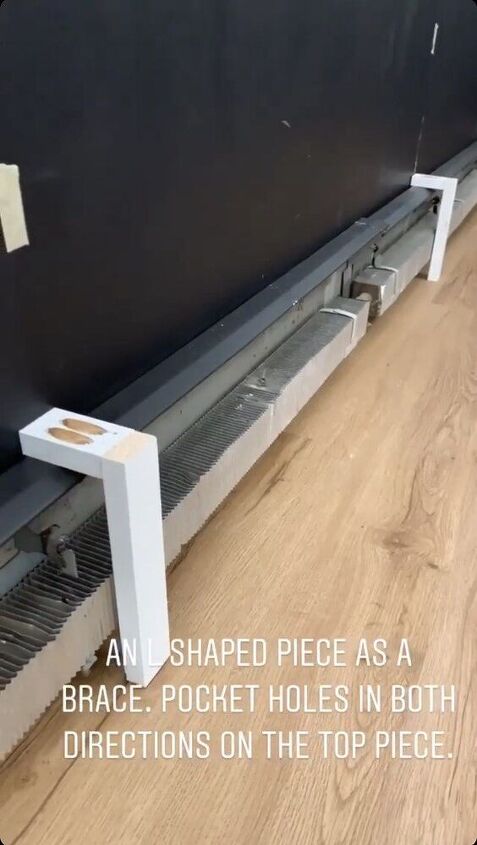
Step 1: L Brace


The first thing I did was create an L shaped brace that went over the top of my existing heater cover backing (the metal front pieces should all be removed). This bracket serves as a way to attach all the other pieces including the front slats and top cover. I placed one at each end and spaced them approximately every 4′. 

Because of that, it needs to be secure but not necessarily pretty on the top (as this will be covered). So I used a small piece of 1×2 cut to fit. The height of my L shaped bracket was 8″ and the horizontal piece was just under 3″. I created pocket holes in both directions on the smaller piece. This piece was then attached to the front vertical piece with 1.25″ pocket hole screws. Longer 2.5″ pocket hole screws were used to attach the back side of the horizontal piece to the wall and screwed into the studs.


Step 2: Attach Top Cover


Next up I attached the 1×4 boards to create the top panel or cover. These were nailed directly into the L braces they sit on top of.

Step 3: Attach Front Slats


Starting at the top to create a flush edge, attach a 1 x 2 board using a nail gun. Clamps help with this step so you can get the edge flush and still have free hands. To attach the second slat, turn one 1×2 sideways and put between the top slat and the second slat. This will create a 3/4″ gap. Clamp this in place and nail to attach. Repeat this process until all 4 boards are attached.

Step 4: Finish


Fill nail holes and any seams (you may not have seams if your heater is less than 8′ in length) with wood filler. Let this dry and sand until smooth. I also added some caulk between the baseboard heater cover top and the wall before painting. Then finish with painting any color you like! If you want a more traditional look, stick with white to match your trim. I chose black here to help it blend with the wall a bit more.

Final Baseboard Heater Cover


And week 4 of the One Room Challenge is a wrap! Check out my  post from a couple weeks back to see how I smoothed the wood paneling in this room (yes, those walls are wood paneling)! Still 4 more weeks to go (and I’m happy about that because lots of work left to do!) so make sure to check out the  ORC blog to see the other amazing projects!

Baseboard Cover Close Up
Resources for this project:
See all materials
Any price and availability information displayed on [relevant Amazon Site(s), as applicable] at the time of purchase will apply to the purchase of this product.
Hometalk may collect a small share of sales from the links on this page.More info
Sarah
Want more details about this and other DIY projects? Check out my blog post!
Go
Frequently asked questions
Have a question about this project?
  3 questions
  • Mon10486713 Mon10486713 on Jun 18, 2022

    Does the wood need to be a certain distance from the heather coils to avoid fires?

  • Leslie Leslie on Jun 17, 2023

    Hi Giselle, LOVE this and am wondering if your original baseboard heating covers were the old steel covers with the slots on top and how difficult was it for you to remove them? Thank you for taking the time to answer. I bet this would look lovely in lattice and the decorative radiator cover sheets. Thank you for sharing :)

  • Carol rathburn Carol rathburn on Jun 20, 2023

    Does The Wood Suck up All the Heat it looks thick ?? Thank You

Comments
Join the conversation
2 of 24 comments
  • Emily Harris Emily Harris 4 days ago

    Great idea!

  • Omaifi Omaifi 4 days ago

    I love the tip about painting the brackets and slats beforehand, I’ve made the same mistake of skipping that step and regretted it later. Your cost breakdown is super helpful, too, especially for budget-friendly DIY projects. When I was updating my home, I focused on improving heating systems, and reading about furnace repair in Sacramento https://alphamechanicals.com/heating-repair/ helped me better understand how to maintain efficiency.

Next