DiY Cedar Cube Landscape Lights

by
Handan & Greg @ The Navage Patch
(IC: blogger)
2 Materials
1 Day
Easy
If you've ever bought inexpensive solar landscape lights from Home Depot or Lowe's, you're probably familiar with their Achilles heel: the cheap plastic spike that sticks into the ground. By tossing the spike and the shaft in their rightful place (the garbage can), you can get on with the business of making an elegant and durable solution.
The photo below depicts a rare specimen who's stake has survived a whopping three years. This is akin to a 300 year-old Galapagos tortoise. The problem of premature breakage and lost spikes has plagued all but the remotest and most forgotten of our lights.
Don't like where you put that light? Want to move it, do you? Well here's your shaft, but the spike stays in the ground! Not watching where you're going? Leg brushed up against the light? That'll be a broken spike! Dogs got into your garden? Ran into one of the lights? You better believe that spike's a goner! To sum up: Lights: good. Spikes: cheap Chinese crap. Between the Mostly Excellent Light and the Spike of Counted Sorrows lies the Shaft of Mediocrity. Meh, it doesn't care one way or the other if it lasts three days or three years. It sits there in the ground, mostly good, but then it may decide to crack or split or calve off a rounded bit of itself like a Greenland glacier birthing icebergs in summer. Between our squirrel-mad dogs rampaging through the landscaping and my oafish galumphing, it's a wonder any spikes survived. However, those few unlucky survivors were quickly and efficiently dispatched during Handan's frequent and unpredictable changes-of-heart concerning design elements and lighting placement. Last year, Handan suggested I fashion new spikes from cedar to replace the lost Spikes of Inferiority. Down into my lair I went and returned with enough cedar stakes to slay several platoons of vampires. But the undead would have to wait, as these spikes were for the soil, not cold, unbeating hearts.
They worked well...for a year. But this year, a few of them started to snap when we moved them. Mostly though, they remained strong and resolute - so much so that the Shafts of Mediocrity began to shatter like the adolescent delusions of young adults entering the real world after two decades of moonbeams and snowflakes.
With the Pond Project in full swing this year we needed a solution. As always, Handan hit upon the answer while I was off chasing bugs and chuckling like a dunderhead. Her idea was to get a few cedar 4x4s and cut them into 4 inch cubes. Let me clarify: her idea was for *me* to get a few cedar 4x4s and for *me* to cut them into 4 inch cubes.
-----------------------------------------------------------
-----------------------------------------------------------
I then got to work building the pillars. Then I stained them in the same manner as the blocks.
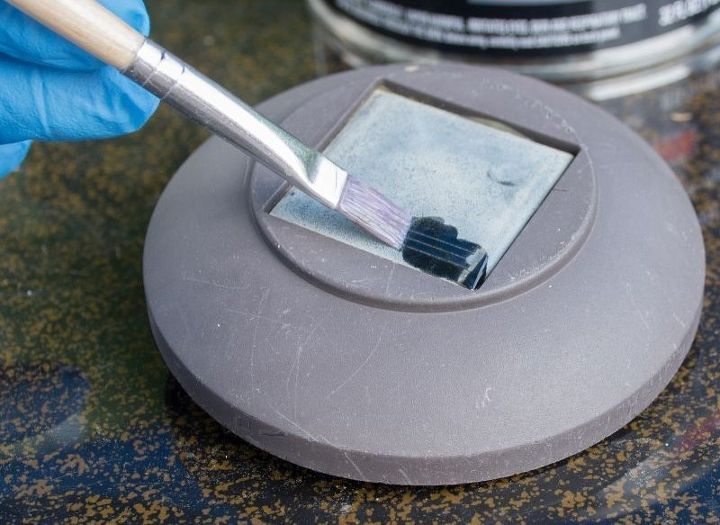
When the stain had dried, we were ready to give them their lights and place them in the garden, but before we get to that, I want to tell you about another problem these lights suffer from: solar panel degradation. Since the panels are made of plastic, after one year in the elements, the plastic begins to haze. After two or three years, the plastic yellows and warps. This cuts down on the solar cells' ability to gather light and charge the batteries, since the yellowed plastic is blocking a lot of usable sunlight. I fixed all our solar panels with a very easy single step solution.
After the solar panels were refreshed and we had put all the lights into their cubes, Handan placed them around the garden...
If you are interested in similar crafts & DIY projects, click on the link below to see more crafts & DiY projects from The Navage Patch.
Thanks for reading! --Greg
Enjoyed the project?
Suggested materials:
- Wood
- Stain

Want more details about this and other DIY projects? Check out my blog post!
Published June 27th, 2016 9:17 AM
Comments
Join the conversation
2 of 235 comments
-
 Nan109789744
on Jul 17, 2024
I love them. Planning how many I need now.
-
-
 Emily Harris
on Aug 18, 2024
I love it! Great idea! I’ve been thinking about refreshing my backyard too, and this might be just the inspiration I needed. I’m already planning to buy some new home decor to spruce things up, and wayfair has been my go-to for finding unique and affordable pieces. Combining a DIY project like these lights with some new decor sounds like the perfect way to create a cozy, inviting atmosphere. I’m definitely adding this to my backyard makeover plans!
-













Frequently asked questions
Have a question about this project?
We did this on either side of our driveway at the beach. Tallest 4X4 was 4 feet tall and then in increments, shortest was about 1.5 feet tall. Four posts all together. Then we wrapped 1 inch sail boat line around a few times to give them a nautical look. They turned out fabulous. Our problem was one light shed too much light on the others and we had trouble adjusting them to all light up at dusk. Would like to do this again but not sure how to get the lights right. Any suggestions and did you have a problem with this at all?
I absolutely love your descriptiveness!!!
do you recommend polishing the solar panels BEFORE they go all hazy?