


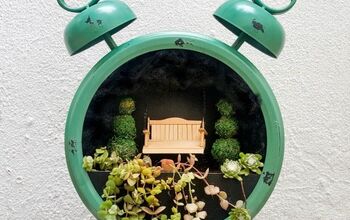
How to Build a Show-Stopping Outdoor Clock Planter in One Afternoon

I’ve always joked that the only thing my garden couldn’t grow was extra hours in the day, so I decided to plant a few!
Today we’re turning a plain planter into a clock planter that tells time and tells your neighbors you’ve got serious DIY game.
It’s personal, budget-friendly, and downright satisfying (think: bragging rights every time someone asks where you “bought” it). Ready?
Let’s make time bloom.
Why You’ll Love This Project
- Personalized décor: Match the planter’s trim to your patio cushions or paint the hour markers your favorite team colors.
- Budget-friendly: A basic clock kit and a large planter cost far less than those designer outdoor clocks.
- Conversation starter: It’s a garden focal point that’s practical and pretty—no more checking your phone with dirty gloves.
- Beginner-friendly: Straightforward steps, simple tools, zero fancy carpentry.


Tools and Materials:
- Planter
- Outdoor clock mechanism kit
- 1/4" drill bit + drill
- Painter’s tape
- Ruler
- Waterproof epoxy or silicone sealant
- Outdoor spray paint or sealer (optional)
- Decorative hour markers
- Strong exterior-grade adhesive
- Clear fishing line or picture-hanging wire
- Safety gear: goggles, gloves
Hometalk may receive a small affiliate commission from purchases made via Amazon links in this article but at no cost to you.

1. Pick the Perfect Planter
Choose a planter that’s broad, lightweight, and has a solid back or base. Avoid drainage holes dead-center—your clock spindle needs that spot.

2. Mark & Drill the Center
Flip the planter upside-down. Use a ruler and painter’s tape to draw an X across the base; where the lines cross is dead-center. Drill a 1/4" hole straight through.

3. Install the Clock Mechanism
Feed the spindle through the hole from the inside. On the back, tighten the washer and nut until snug. Pop on the hour, minute, and second hands per kit instructions. Seal around the spindle with silicone so summer storms don’t flood the works.


4. Add Hour Markers & Flair
(I didn't do this step yet, but I do think it would increase the functionality and flair, so I plan to get to it.)
Lay the planter flat. Arrange 12 markers equally around the face; secure with exterior adhesive. Options:
- Stain wood slices for a rustic vibe.
- Glue mini faux succulents for a quirky “green” face.
- Stick sleek metal numbers for modern style.
5. Paint, Seal & Cure
If you’re adding color, mask the clock hands first. Spray the planter and markers with outdoor paint or clear sealer. Let dry 24 hrs.

6. Hang or Display Your Clock Planter
Run picture-wire through existing planter holes or mount a sturdy wall hook. Prefer tabletop? Nestle the planter on an outdoor shelf amid potted herbs—instant garden gallery!
I had a friend over the day after I hung mine and she liked it so much, she brought over her Blushing Philodendron for me to "convert" that to a clock as well! How cute, right?

Quick Maintenance Tips
- Swap batteries every 6–9 months.
- Gently wipe dust off hands with a microfiber cloth—no water needed.
- If temps drop below freezing, store the planter clock indoors to prevent cracks.
Time to Show It Off
Who knew a planter could multitask as a garden timekeeper? We drilled, fitted a simple mechanism, dressed it up with creative markers, and in one laid-back afternoon, our patio gained both style and schedule.
Give this clock planter a whirl, then tell me in the comments how you personalized yours.


Frequently asked questions
Have a question about this project?