Iron Bench & Table Into Chair & Ottoman

This past weekend I was able to do a little hocus pocus and turned an old, dilapidated iron bench and table thingy into a pretty magical chair and ottoman. This set was generously given to me by a good friend. (Thank you, Kirk!)
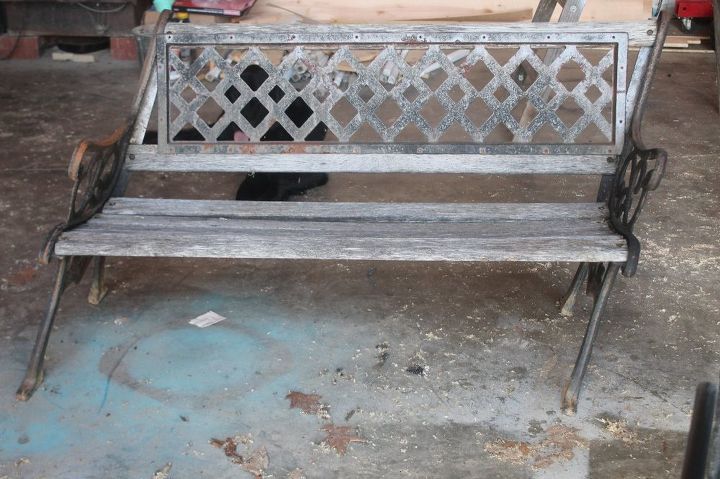
The photo above was after my hubby had already started to dismantle it. >:-\ I had to -sort of- put it back together so I could get a “before” pic. As you can see, the pieces weren’t fitting just right. Although, I think you get the gist of it.
The table had seen better days. But from the looks of it, not in MY lifetime. I needed to get rid of the old, dry-rotted wood and see exactly what I had to work with.
The grasshopper insisted on being in the last picture. I said, “Whatever.” I wasn’t in the mood to argue. If you know me, then you know that I paint EVERYTHING. So, before I did that, the first order of business was to get rid of the rust. My method of choice: I used steel wool and elbow grease. After that, I wiped it down with a dry cloth. Then, I grabbed my can of Rustoleum Fire Orange spray paint and got to spraying. I chose this color to accent the fabric I was planning on using with this. You can imagine my dismay when I instantly found that the color of the lid DID NOT correspond to the paint in the can. (After seeing the actual paint color, I decided to rename the color “Bozo-the-Clown’s-Wig Orange”.) I WILL repaint it. Just not yet.
Now I was ready to use me some power tools! I was planning on doing this little project all on my own but since I’m still quite leery of the table saw, I asked my wonderful hubby if he would cut the 5/4 deck boards into strips for me. (Little did I know I was going to need his help a lot more on this little project.) Like the gentleman that he is, he obliged.
After they were cut in strips, I decided to sand them down and router the edges. (I surmised that the longer boards would be easier to handle than shorter ones.) After that step, I measured how wide I wanted the bench and I cut the strips 21″ across using a mitre saw. As you can see below, some of the iron pieces were curved, thus making it impossible for the straight boards to fit correctly.
That’s when I got my hubby back over to help me decide how I needed to fix this. He opted to use the belt sander to round the inside of the boards.
That’s exactly what it needed to fit. Smart man!
Since we had removed the metal piece in the center of the bench, I had decided that I was going to use fabric for the back of the chair (sort of like a director’s chair). My husband didn’t know if the chair would be stable enough with just the two strips of wood in the back. Time would tell but first I wanted to paint it again. Wish me luck!
Ahhhh…much better! After the paint dried and I was happy with the color, I got my fabric and put it on the back of the chair. Eh. I wasn’t feeling it. So, I decided that maybe I should just continue with the boards down the back of the chair. Since there hadn’t been boards there in the beginning, I needed a few more holes drilled. “Sweetie, can you help me again?” He did. :-)
Since we were omitting the fabric and attaching wood strips, it should definitely be stable enough now. Moving on to the ottoman…Jamie had bought me a piece of treated plywood to use as the top. We decided on the dimensions (29″ square) and he cut it for me. (I’ve not used a circular saw before-that’s my next tool to conquer!) The rest of it was now in my hands…literally! I brought it to the house where I put a piece of 2″ foam on the top and covered with batting.
Then I laid the covered board on top of my fabric and stapled the indoor/outdoor fabric to the wood. After I was finished with that part, I brought it back over to the barn so I could attach the legs to it. (I apologize for not having a photo, even though I only uploaded 12 photos, it says I can't have anymore than 15 (?). Anyhoo, you can see all the pics at my blog, if you want.)
Finally, my job was finished and my idea was now a reality! I wanted to do this project all on my own. As you can see, I couldn’t have done it without Jamie’s help.
Enjoyed the project?

Comments
Join the conversation
-
 Gig69451122
on Aug 01, 2023
How very creative ‼️ Love how you repurposed the wrought iron pieces. To think, something that started out like that? Would probably have ended up in the trash. So many uses, for the wrought iron ends too. ❤️ this...ty
-
 Heather McKinney
on Aug 01, 2023
Thank you for the kind words!
-
-
-
 Daisy@TX
on Feb 14, 2024
Tornado in 2019 did a lot of damage. I had an old bench looked like yours but we were going to restore. Well tornado took care of the dismantling for us. Somewhere in the yard are the pieces. I also had two child benches. I found those pieces. Thank you so much for your inspiration. Love what you did....I will try the same.
-











Frequently asked questions
Have a question about this project?
How well will the fabric endure the elements?
Love it. Are those 1x2s
I had the same dilemma with the back of the chair. What size drill bit did your husband use and did you follow the same distance on the backboards as you did for the distance on the seat boards? I’m so excited that I saw your post! Inspired!’n