Old Sewing Cabinet Gets Re-purposed

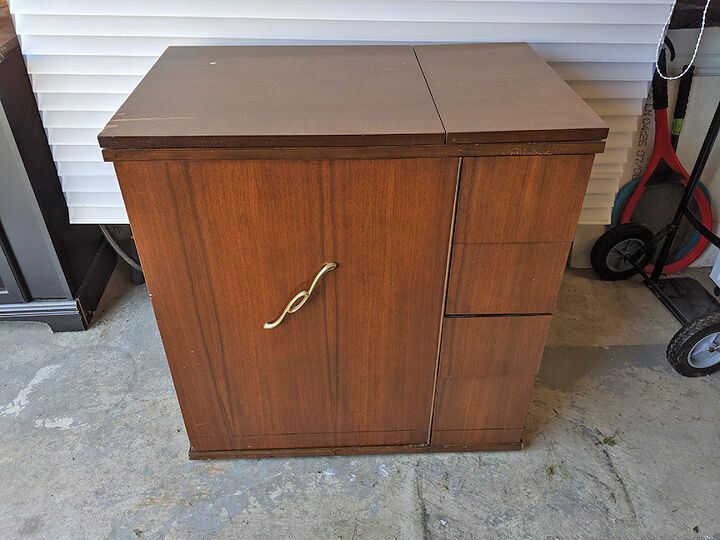
I came across a 1959 sewing cabinet (minus the machine) online for $15.
So I picked it up and gave it a makeover, to be used as extra storage and surface space.
The veneer on the cabinet top was damaged. And when you opened up/folded back the top, there was a big hole, where the sewing machine sat originally.
So the first thing I did was go to Home Depot and buy pine wood and have them cut it to the exact same sizes as the two original fold out pieces.
Then I removed the two originals from the cabinet, flipped them over and attached the new pine wood to the original top, using the existing hinges.
The hardest part of this project for me, was notching out holes to sink the hinges down into the new wood. I did some research and apparently the best tool to do this is a router. Which I do not have! (But guess what I've asked Santa/mommy for this year? lol)
So I used what I had, a hammer and a chisel. It was a bit of a hack job. But I was able to get the job done.
I used wood filler to cover the hinge notches that were on the cabinet itself. I only did the outside edges as the inside would not be visible once I re-attached the top.
I also removed the handle from the door and filled those holes with wood filler.
I then added castors to the bottom.
For the inside of the cabinet I wanted to create shelves.
I had two pieces of pine wood on hand, but they were not deep enough to reach the back. So I found a piece of laminated material in my scrap pile the same thickness and decided to use that as a filler piece at the back of the bottom shelf. Even though it was glossy and white, I though it might make a neat contrast up against the wood once it was stained a dark colour.
I noticed after a couple of days the pine wood was starting to warp slightly. Probably because it was cold and damp in the garage and the wood was unsealed. So I brought everything inside to finish it up. I placed something heavy on the wood and the warps went away, thankfully!
I glued the original top to the cabinet. Then clamped it and left it to dry overnight. Once dry I added screws, going from inside the cabinet up into the top.
Then I sanded everything lightly and stained the pine top and shelves using a dark walnut gel stain. I applied it with an old t-shirt.
Once dry I applied stain sealer, using a foam brush.
I screwed the bottom shelf peices into place. I flipped the cabinet on it's back and screwed from the bottom up.
Then I painted the cabinet a light grey. The little indents on the sides of the drawers (for opening them) I left the original brown.
I didn't like how the white filler piece in the bottom shelf looked at all! So I applied the same gel stain using a little chip brush. I was amazed how well it worked!! It took about 3 minutes to do and made a huge difference to the overall look!
Then the final step was to apply a re-design transfer to the front. I had received it as a gift and thought it would really make this piece pop. My 9 year old daughter and I applied the transfer together, following the instructions.
I had never used a transfer before and loved the effect! No plastic outlines like there are with decals. Up close it actually looks like it’s been painted on! LOVE!!
I found an old antique door pull in my garage and used that instead of the original.
And here it is...after it’s makeover!
This empty shell has been transformed into a pretty functional piece.
A great piece for additional kitchen storage/counter space or as a bar cart for entertaining!!
If anyone has one of these old sewing cabinets cast aside and taking up space, hopefully this inspires you to dust it off and make it functional again! :)
Enjoyed the project?
Comments
Join the conversation
-
 Melinda Record
on Dec 03, 2020
OMG ~ this repurpose is sensational! You are so clever and talented to have so beautifully transformed this old, tired sewing machine cabinet in to a beautiful, trendy furniture piece. I am blown away by your hard work and great talent. Truly awesome!
Thank you very much for sharing!


-
 Valerie Burge
on Dec 04, 2020
Thank you so much for your kind words, Melinda!!


-
-
-
-
 Valerie Burge
on Jan 02, 2021
Thank you so much, Cathy!

-
-











Frequently asked questions
Have a question about this project?
This looks gorgeous!! When you glued the original top down, was that to cover the sewing machine hole? Nice job truly with what you had on hand!
Nicely done
Beautiful job! Do you mind me asking where you purchased the vintage decal.
I'm starting a project this morning (upcycling a mirror I purchased at Goodwill for $9.99) I'm going to antique it and add a French decal but haven't been able to find one I like in the right size.