DIY Maple and Metal Table

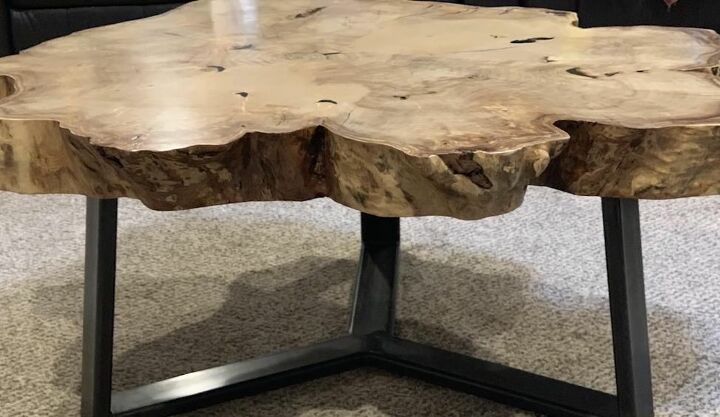
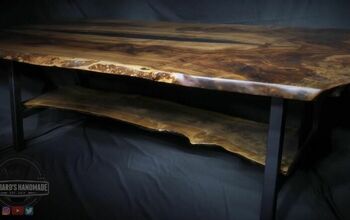
My favorite projects often start with an interesting piece of wood and when I came across a huge, 40 inch round maple slab, I knew I wanted to use it to create a live edge table. I flattened, sanded, patched with epoxy, and sealed the wood for a gorgeous tabletop. I added a triangular metal base that I had fabricated locally and the end result is something I am very proud of! This was a relatively simple process with the right tools and effort and I would recommend all of the materials that I used to finish the wood slab into a striking maple and metal table. Search your local classifieds and don’t hesitate to grab slabs you see for sale to try your own version of this table creation!
You Will Need:
- Epoxy putty
- Casting craft epoxy
- Epoxy black tint
- Mixing cups
- General Finishes Seal-A-Cell
- General Finishes Enduro-Var
- Drill driver/impact combo
- Drum sander
- Hand sander
I used a router to flatten the maple slab down to four inches thick in order to allow it to fit in my drum sander. It was still a tight fit but I was able to send it though for a few passes.
After flattening the slab, I ran it through the drum sander several times and then sanded it the rest of the way with a hand sander.
I prepped all of the bark inclusions and cracks or holes with a dremel tool and then plugged any holes on the underside of the slab with a two-part clay epoxy product to prevent the epoxy from running through it. I also placed painters’ tape over the clay epoxy just to be certain no leaking would occur. The dremel drill bit was very effective at removing the sawdust-like debris inside of the cracks in the slab.
I measured and mixed the epoxy with a paint stirring drill bit. I mixed a small amount of dye into the mixture and slowly poured it into another cup to ensure that none of the unmixed portions of the solution ended up in the pour. I poured the new container of epoxy over and into the cracks and holes in the slab until they were flush with the surface. Do not scrape the sides of the original container as you pour into the second container.
After filling the cracks and holes with epoxy, I had to grind it down and sand the surface smooth to get it flush again with a hand sander. Even though you will tire of sanding with this project, putting care and effort into this step will ensure a satiny finish in the next step.
I started the finishing process for the table with one coat of Seal-a-Cell clear because it is ideal for wood that is not going to be stained and leaves a natural warm look while insuring hardness. I applied the first coat with a wide sponge brush and then switched to a spray finish water-based urethane applied with a paintbrush. Make sure to coat the entire surface and all around the edges.
I ordered a custom fabricated metal base for the table and attached it with the supplied lag screws to the underside of the tabletop slab. Welded table bases can be custom ordered online and fabricated to your desired specifications.
I am thrilled with how the table turned out and how the huge, rough maple slab evolved into such an interesting and handsome piece of furniture for our home. Handmade tables like this one require effort that is well worth putting forth for the unique conversation piece it will be in any home. My table is so solid and heavy it is perfect in the den and would make an awesome table for a vacation cabin, log home, or man cave!
Have you used a live edge slab or piece of maple to create custom DIY furniture or decor for your home? Share all of your best DIY custom wood furniture project tips and photos, or find ideas and inspiration for incredible woodworking projects like this one on Hometalk!
Enjoyed the project?
Comments
Join the conversation
-
 Linda Abate
on Apr 23, 2023
This table is absolutely gorgeous. I love the live edge furniture.
-
-
 Brenda Southerland
on Apr 08, 2024
So beautiful- I have an oak slab in my garage that I need to get going on. This is an inspiration!!!
-













Frequently asked questions
Have a question about this project?
Where did you order the base from? I love the table top and base!
What do you use if you don’t have a drum roller to press the wood? I have the wood, but no tools accept drills and sanders. Where did you buy the base for the table? I don’t know if anyone who could press the slabs.
How did you remove the drips from the run-off?