Real Looking Faux Marble Countertop Update

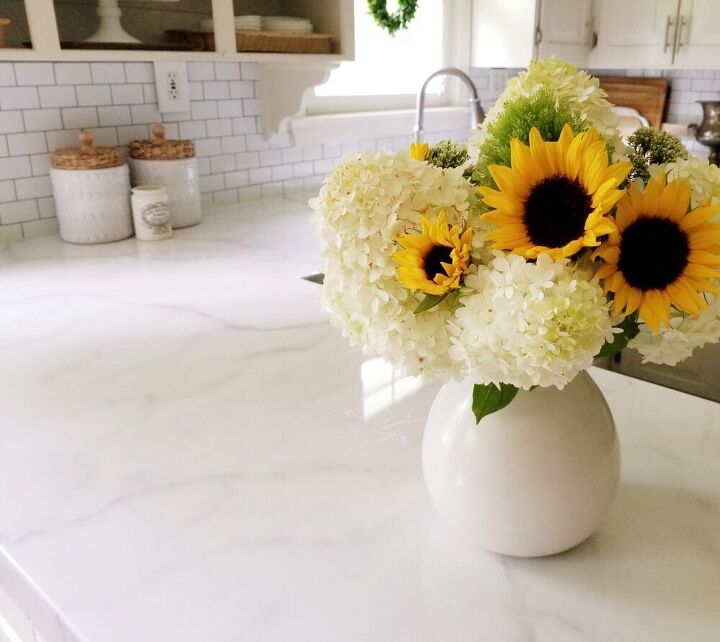
I gave my shabby counters a beautiful realistic faux marble update.
My counters were looking very worn and were a real eyesore. We are planning a complete remodel.of the kitchen but not for 2 years.
Hometalk Recommends!
I decided I needed a budget friendly update. I found a faux marble countertop kit by Giani on Amazon. I was ready for a budget friendly update.
I taped off the backsplash and sink and sanded a few rough spots to prep for paint.
I used a foam roller to roll on several coats of the white paint. I let the counters dry completely between coats. I gave the counters four coats in all.
I next was ready to add the veins.
I used a medium gray paint for the veins. I applied them with a thin artist brush.
I used a spray bottle filled with water to mist the line immediately.
Then I used a paint brush to soften the line.
I added all the major veins around the countertop.
Next, I added some shadows and minor veins. I kept adding until I was happy with the look.
I softened the veins even further using a paper towel.
I let the veins dry overnight.
I used 600 grit sandpaper to sand down any high points left by the paint.
Then I wiped them clean.
I retaped the backsplash and taped dropcloths to the tops of the cabinets and draped over the floors to protect them from overflowing epoxy.
Next, I mixed the epoxy.
I poured the epoxy onto the countertop. Each can of epoxy covers about 6 feet of countertop.
I used a paintbrush to edge the counters and around the sink.
I used a foam roller to spread the epoxy and coat the edges. You do not want to overwork the epoxy and move quickly as it dries quickly.
I let the epoxy cure for 1 1/2 hours and then removed the tape and drop cloths.
The epoxy will be tacky for several hours. The epoxy needs 7 days to cure completely.
They turned out so realistic and are a total upgrade!
We love the way they turned out!
Enjoyed the project?
Comments
Join the conversation
-
 Bonnie Carroll Sides
on Aug 10, 2023
Several good questions asked last year. Any response??
-
 Lorraine Dohm
on Aug 17, 2023
Pop
-
-
-
 Omaifi
on Jan 18, 2025
Looks amazing! I’ve seen the Giani kits and have been tempted to try one myself, especially since my kitchen is in that "waiting-for-a-remodel" phase too. The way you layered the veins and softened them looks like it made such a realistic effect! When I updated my kitchen, I focused on budget-friendly pieces like dining chairs from Bad Boy Furniture, which tied the space together nicely.
-















Frequently asked questions
Have a question about this project?
Nice Job. What was the original countertop material? Wood? Granite? Quarts?
Any body anywhere k ow where to get a drill bit to remove these from under my countertop to remove it?
What material was the original countertop? Can the faux marble effect be done on a dark formica countertop?