


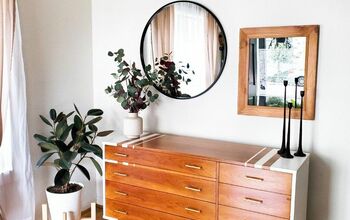
How I Transformed a Curbside Dresser Into a Modern Accent Piece

This article is sponsored by Titebond.
A neighbor told me she was going to set an old dresser by the curb to be picked up by the trash the next day.
So naturally, like any good DIYer, I said I’d love to take it off her hands.
But when I brought it home, it was in pieces.
I wasn’t really prepared for how rough the condition of the dresser was going to be, but I figured I’d give fixing it a go.
With a lot of patience, some creativity, and plenty of Titebond Instant Bond Adhesive, I was able to completely transform it into a modern dresser with bamboo drawer fronts and sleek black hardware.

Titebond Woodworking Glues
Tools & Materials:
- Shop-Vac
- Utility knife
- Miter saw
- Orbital sander
- Sanding block
- Razor blade
- Paint roller
- Paintbrush
- Drill
- Sharpie
- Painter’s tape
- Titebond Instant Bond Adhesive Gel
- Bamboo wall wrap panels
- Scrap MDF pieces
- Degreaser
- 220 grit sandpaper
- Primer/paint/sealant all-in-one paint in soft gray
- Modern black drawer handles
Table of contents
- 1. Clean and Prep the Broken Dresser
- 2. Reattach the Missing Feet
- 3. Repair Loose Rails and Trim Pieces
- 4. Fix the Damaged Drawer
- 5. Prepare the Drawer Fronts
- 6. Add MDF Support Pieces
- 7. Attach the Bamboo Panels
- 8. Deep Clean the Dresser
- 9. Sand the Surface Carefully
- 10. Finish the Final Repairs
- 11. Paint the Dresser
- 12. Create Accent Drawers
- 13. Test Fit the Drawers
- 14. Install the New Hardware
- 15. Final Reveal

1. Clean and Prep the Broken Dresser
I decided to start at the bottom where multiple feet were missing. First, I wiped everything down to get rid of dust and grime stuck to the dresser.
Safety first because of the fumes.

I prepped the dislodged feet and the surface areas where they would be reattached.

2. Reattach the Missing Feet
Instead of reusing the screws that were way too small, I reached for the hero of this entire project: Titebond Instant Bond Adhesive.

It was incredibly easy to apply thanks to the detailed nozzle.
Once I placed each foot, it only took about 20 seconds for it to set. Since it’s a two-part bond, the initial cure took less than a minute.
I repeated this process for all the unattached feet and was able to secure them firmly without using any screws.
3. Repair Loose Rails and Trim Pieces
Next, I repaired the rails that had come loose. I used the adhesive to reinforce the screws in areas where the material had broken down and could no longer grip properly.


One of the entire front panels had also been pulled off accidentally during transport. The Titebond adhesive worked perfectly for reapplying this large and important piece of trim to the dresser.

4. Fix the Damaged Drawer
Once the main body repairs were complete, I turned my attention to a drawer that was basically holding on by a single screw and a prayer.
Again, the adhesive came in handy.
Although it’s primarily designed for wood and wood products, it also works on a variety of materials, which was perfect because this drawer had several different components that needed to be glued back together.

5. Prepare the Drawer Fronts for Bamboo Panels
With all the old handles removed and repairs completed, I wiped down all the drawer fronts to make sure I had a clean working surface.
My plan was to attach bamboo wall wrap panels to the front of each drawer.
I rolled the panels out across the drawer fronts and used a utility knife to cut them down to length.

To size the height correctly, I marked each drawer measurement with a Sharpie and rolled the bamboo back up so I could trim it with the miter saw.
Even though it’s hard to see on camera, I could actually see the Sharpie marks through the mesh backing.
My husband really wanted to help with this part, so I let him.

I repeated this process for all six drawers.
6. Add MDF Support Pieces
Before attaching the bamboo, I completed an invisible but really important step.
The edges of the drawer fronts sat much higher than the centers, so I glued scrap MDF pieces into the center sections.

These would later give me something solid to drill into when installing the new handles.
Once again, Titebond Instant Bond Adhesive made this super easy.
7. Attach the Bamboo Panels
I carefully applied adhesive along the edges of each drawer front and pressed the bamboo panels into place.
The longer working time — up to 30 seconds — gave me plenty of time to reposition everything before it cured.
I repeated the process for all six drawers, adding adhesive and MDF support pieces to each one. The narrow tip on the bottle made application really precise and easy to control.

8. Deep Clean the Dresser Before Sanding
With the drawer fronts complete, I turned back to the main dresser body.
I used the Shop-Vac to remove any remaining dust and debris, then wiped the entire top down with a degreaser.
This helped remove oils from fingers, nail polish, hair products, and whatever else had built up over time.

This step is really important because sanding before degreasing can actually push oils deeper into the wood.
I also cleaned the inside sections where the drawers slide in.
9. Sand the Surface Carefully
Because the dresser had a very thin veneer, I used 220 grit sandpaper so I could work slowly and avoid sanding through it.

There were still a lot of baked-on products stuck to the top surface.
Sanding helped smooth things out, but some stubborn spots remained, so I used a razor blade to scrape them away manually.
I also used a sanding block around the curved edges where the orbital sander couldn’t reach properly.

10. Finish the Final Repairs
After sanding, I handled a few final repairs around the dresser.
The adhesive was especially helpful in hard-to-reach areas and in spots where clamps would have been difficult to use because it grabbed so quickly.

Once all repairs were complete, I wiped the dresser down again with degreaser to remove sanding dust.
11. Paint the Dresser
Before painting, I used painter’s tape on the surface of my roller to remove loose lint that could ruin the finish.

The product I chose was a primer, paint, and sealant all in one in a beautiful soft gray color. I thought it would contrast really nicely with the old finish and the natural bamboo.
I worked slowly to get a smooth, even finish while remembering that multiple coats would be necessary.

I painted the tops, sides, and front of the dresser, using a brush for tight areas and a roller afterward to smooth everything out.

12. Create Accent Drawers
I painted only four of the drawers completely because I wanted to do something different with the last two.
For those top drawers, I decided to leave the bamboo natural as accent pieces.
I used painter’s tape to cover the bamboo while leaving the old brown portions exposed so I could paint them gray to match the dresser body.
Once painted, I set all the drawers aside to dry.

13. Test Fit the Drawers
As soon as the drawers were dry to the touch, I carefully test fit all of them back into the dresser.
The paint wasn’t fully cured yet, so I tried to be careful — but I was too impatient not to see how it was all coming together.
A few small tweaks later, the transformation was finally starting to feel real.
I was especially glad I decided to leave the top two drawers with the natural bamboo finish.

14. Install the New Hardware
One of my favorite parts of any furniture makeover is adding the hardware.
I used painter’s tape marked with the handle screw spacing as a drilling guide. After drilling the holes, I inserted the screws and attached the handles.

I chose simple modern black handles that would stand out against both the bamboo and the soft gray paint.
They ended up being the perfect finishing touch.

Final Reveal
Looking back, I still can’t believe this is the same dresser that arrived at my house in pieces.

All it took was a little imagination, a lot of hard work, and plenty of Titebond Instant Bond Adhesive gel.
You would never guess how many parts of this dresser are now being held together with adhesive, but the strength of the bonds makes me confident it’s going to last for a very long time.

Has this DIY cabinet makeover inspired you? Comment down below.

Titebond Woodworking Glues
Comments
Join the conversation
-
Nice!!
-
Who has all that time & energy??
Turned out very nice!!


Frequently asked questions
Have a question about this project?
What can I use to get rid of ants on my porch? I have outdoor furbabies so it has to be natural.