Add a Jolly Touch to Your Holiday Décor With Santa String Lights

There is nothing more Christmassy than Santa and today I am going to show you how you can easily include him in your holiday décor by making these adorable Santa Clause string lights. I have also included a bonus décor project, my darling Santa belt buckle ornaments. You can see more of my crazy creations here
Grab your supplies and let’s get started!
This post was transcribed by a member of the Hometalk editorial team from the original HometalkTV episode.
Santa Clause string lights
Pick up some red solo cups. The mini version works perfectly for this project.
1. Measure and cut the diamond adhesive wrap
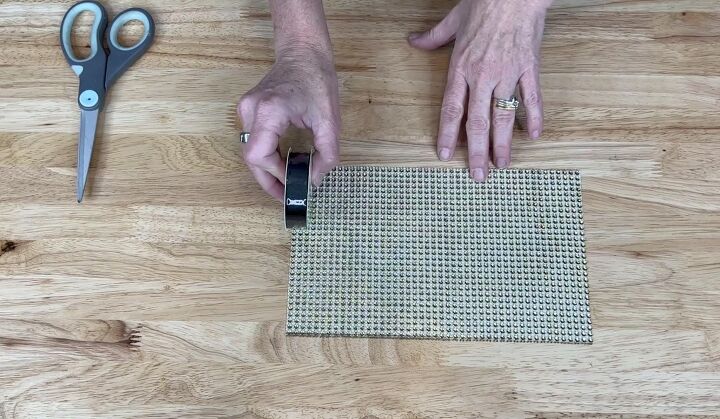
Start by measuring the width of your ribbon against the diamond adhesive wrap.
Cut three strips of the diamond wrap the width of the ribbon.
Now take each strip and cut them down into squares. The number of squares you need will be determined by how many red cups you have.
Now, cut out the center of the squares to make them look like belt buckles.
2. Measure and cut the ribbon
After that, measure the black ribbon around the red solo cup and cut it to the appropriate length.
3. Stick the ribbon to the cup
Glue your black ribbon to the cup making sure to pull it tight all the way around.
4. Place the belt buckle on the ribbon
Peel off the diamond adhesive belt buckle and place it onto the red cup. You'll need to repeat this process for all of the cups.
5. Cut an X at the bottom of the cup
Next, cut the bottoms of the cups with a utility knife in an X format.
6. Push Christmas lights through the X
Take your Christmas lights and push them through the X that you cut out of the bottom of the cup.
7. Repeat
Repeat this for all of your lights.
Santa belt buckle ornaments
1. Cut the diamond adhesive wrap
The ornaments will be made in the same manner as the cups.
Start with the diamond adhesive wrap and cut little squares.
Once again, cut out the center to make another belt buckle.
2. Measure and cut the ribbon
Wrap the black ribbon around a white Christmas ball to measure the amount you need to cut. The black ribbon should fit snugly around the ball, but leave a little extra so that you have that overlap to glue both sides of the ribbon together.
3. Glue the ribbon to the ornament
Place a little dot of glue on your ornament.
Wrap the ribbon around the ornament so it's nice and snug, and then add a little more glue to the back to hold it in place.
4. Stick the belt buckle to the ribbon
Once this is cooled, take your belt buckle square, peel it off and place it on the black ribbon.
5. Repeat
Repeat this for all of your ornaments and then have fun decorating your tree.
Easy Santa Clause string light tutorial
How adorable are these Santa Clause string lights and belt buckle ornaments? I hope this DIY inspires you to create your own decorations for your tree.
I would love to have you stop by my blog Chas' Crazy Creations for the full tutorial as well as sign up for my latest creations, posts, recipes, exclusives, and more...
I would love for you to subscribe to my YouTube channel to see more of my crazy creations - https://www.youtube.com/c/chascrazycreations
Happy holidays everyone!
DIY Christmas Decorations
Enjoyed the project?
Resources for this project:
See all materials
Comments
Join the conversation
-
-
-
 Catherine Deirdre Rodden
on Dec 23, 2022
Could always do this as an "upcycle" for those K-Cups everyone tries to avoid throwing out too!
-










Frequently asked questions
Have a question about this project?