How to DIY a Farmhouse Inspired Address Sign With Stacked Pumpkins

In years past I've seen where people have stacked pumpkins and put them in a planter--with or without their street numbers on them--so I was going to take a stab at it myself this year and make one for our home with my own touches to it.
However, when I went to Michaels this week to get the supplies, I spotted the half pumpkins that I had started seeing last year; my wheels started turning and I made it my mission to create a stacked pumpkin address door hanger.
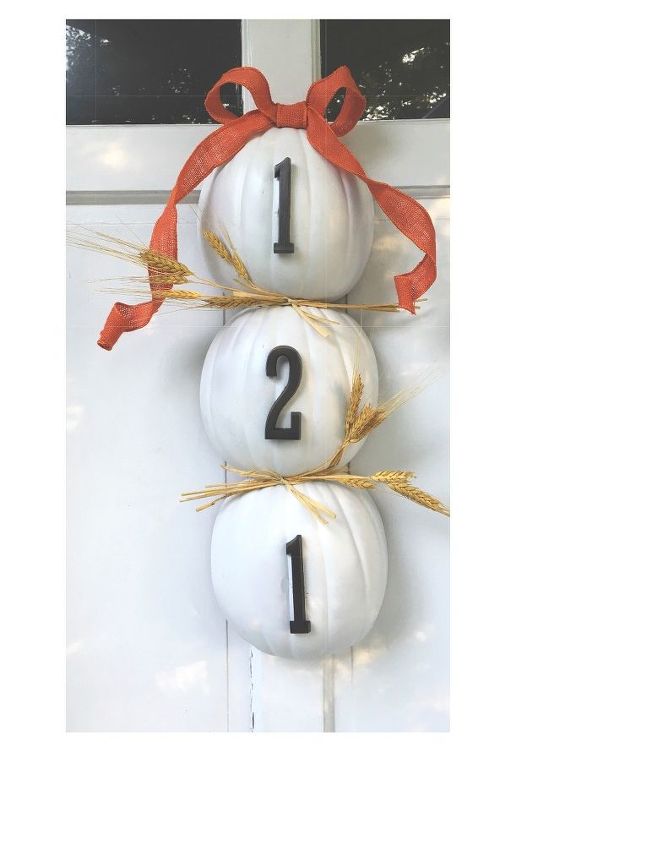
All-in-all I'm really pleased with how this project came out!
I know the alignment is a little off but I'm really digging this door hanger. I'm obsessed with white pumpkins--of course regular 'ole orange ones are nice--but there's something about the white that is so classy and you can do so much with.
Tools and Materials:
- Half pumpkins (I only needed three of them, but obviously, you should get as many of them as you have numbers in your street address.)
- Metal numbers (or wood numbers if you prefer)
- White (flat) spray paint
- Burlap wire ribbon (or any wire ribbon if you even want ribbon on your hanger)
- Barley shoots (or any other flowers/greenery)
- E6000
- Hot glue gun/sticks
- Raffia
- Not pictured: box cutter
1. Attach Pumpkins Together
Okay, so I hope this doesn't confuse anyone, but stick with me here as I try and explain this... For starters, when I did this project, I made the mistake of painting my pumpkins first. DON'T DO THAT! The adhesive will rub the paint off and it'll be messy, so paint them AFTER you attach them.
The first thing you want to do is take a box cutter and CAREFULLY/SAFELY cut the stem off of all of your pumpkins EXCEPT FOR ONE (you'll want to be able to see the stem of the top pumpkin in your stack when it hangs on your door).
Next, apply E6000 to the bottom of all of your pumpkins EXCEPT FOR ONE (this WILL BE one of the pumpkins you cut the stem off of, but it will be the last pumpkin on your door hanger so the top of it will have E6000 on it since it will be stuck to the bottom of the pumpkin above it...make sense?).
Then, with all of the pumpkins lying on their flat/back side, put them together where they are touching. Remember, there should only be ONE pumpkin with a stem (this one goes to the very top) and ONE pumpkin with no E6000 on its bottom (this one goes to the very bottom).
Tip: When applying the E6000, make sure to put it on the pumpkin and let it sit for a minute or two, THEN join it to the next pumpkin. Let the joined pumpkins sit overnight to ensure they have dried and are adhered to each other.
2. Paint Pumpkins
As I mentioned before, you'll want to spray paint your pumpkins AFTER they are adhered to each other. It just makes life easier and less messy.
Two coats should be enough coverage if you're using white paint.
3. Adhere Numbers to Pumpkins
Next, apply hot glue to the back of your numbers and attach them to your pumpkins.
As mentioned in the supplies list, instead of buying numbers, you could also create or buy a stencil and paint your numbers on them.
I would suggest using Behr exterior acrylic paint or something similar - I use this for pretty much any project I'm using paint on.
4. Gussy Up Your Stacked Pumpkins
Gussy up...make pretty...add bells and whistles...add your touch...however you want to put it. I always have raffia on hand and a variety of ribbons, and I picked up a bunch of barley at Michaels, so I chose to do sort of a shabby chic harvest theme with my pumpkin door hanger.
I cut two strands of raffia for each area where my pumpkins joined, tied them off in a knot, and cut the excess. Then, I stuck a few barley sprigs in the raffia and hot glued the ends of some of the barley to the pumpkins so they all weren't sticking out straight.
After that, I made a bow out of my burlap ribbon and hot glued it on the top pumpkin. The half pumpkins come with a keyhole on the back for hanging, so since I already had a nail in my front door, I hung it there.
Discover More DIY Pumpkin Ideas
How to Display Your Address on a Pumpkin
We don't use our front door, but you can see it from the road, so I always like dressing it up, and this is the perfect addition to my fall decor!
When I shut the door and opened it again, I don't recall having any issues with the pumpkin hanger smacking against the door, which is nice in the event I want to have my front door open this fall when we start getting that nice, crisp breeze.
Give it a try, and don't forget to share your experience in the comments below.
Enjoyed the project?
Resources for this project:
See all materialsComments
Join the conversation
-
 Muhammad sherjan
on Sep 16, 2025
This stacked pumpkin address hanger is a creative idea—love how it combines fall charm with practical house numbers. A few tips if you try it: first, use foam or fake pumpkins instead of real ones so it lasts through seasons and weather changes. Make sure each pumpkin is securely adhered to the one below (use strong adhesive and let it cure fully) to avoid sagging or safety issues. Spray paint or paint should be applied after assembly so the joins stay clean. And add accents—like a rustic ribbon, some seasonal greenery, or textured ribbon—to balance the look and blend it with your door or surrounding decor. Finally, pick a hanging method that’s both sturdy and gentle on your door finish.
-
-
 Wasif Ali
on Sep 20, 2025
DIY Farmhouse-Inspired Address Sign with Stacked Pumpkins is a fun and festive way to welcome guests this fall while adding charm to your porch or garden.
Materials Needed:
- Wooden board for the sign (reclaimed wood works well)
- Paint or stain (white, black, or farmhouse neutrals)
- Stencils or vinyl for house numbers
- Mini faux pumpkins (different sizes for stacking)
- Hot glue or strong adhesive
- Optional: Twine, greenery, or burlap for added farmhouse flair
Steps to Create:
- Prepare the Wood
- Sand the board and apply paint or stain in your desired color.
- Let it dry completely.
- Add Your Address
- Use stencils or vinyl to paint the house numbers on the board.
- Keep fonts simple and rustic for a farmhouse look.
- Stack the Pumpkins
- Arrange faux pumpkins by size, largest at the bottom.
- Secure them with hot glue or adhesive to create a stable stack.
- Attach Pumpkins to the Sign
- Position the pumpkin stack above, below, or beside the address board.
- Add extra decorative elements like twine, leaves, or small gourds for a layered look.
- Seal and Protect
- Apply a clear sealant if the sign will be outdoors to protect against weather.
- Display Your Sign
- Hang it on your porch, attach it to a post, or set it in a planter for a welcoming fall display.
Tips:
- Mix colors and textures of pumpkins to create visual interest.
- Keep the design simple for a true farmhouse vibe.
- Use lightweight materials if you plan to hang the sign outdoors.
In short: With a wooden sign, stenciled numbers, and stacked pumpkins, you can create a charming, farmhouse-inspired address sign that celebrates fall and adds rustic curb appeal.
-




![White [flat] spray paint (2-in-1 primer paint)](https://m.media-amazon.com/images/I/31fZqC1AESL._SL75_.jpg?size=80x80&nocrop=1)








Frequently asked questions
Have a question about this project?