McDonalds Happy Meal Fakeaway

As we are currently in lockdown and McDonalds has closed until further notice, the kids have been missing having a little Happy Meal Treat. So I decided to make them one myself. It’s far from perfect but it’s home made and the children loved it (they even thought it was really McDonalds at first) so I thought I would share how I did it.
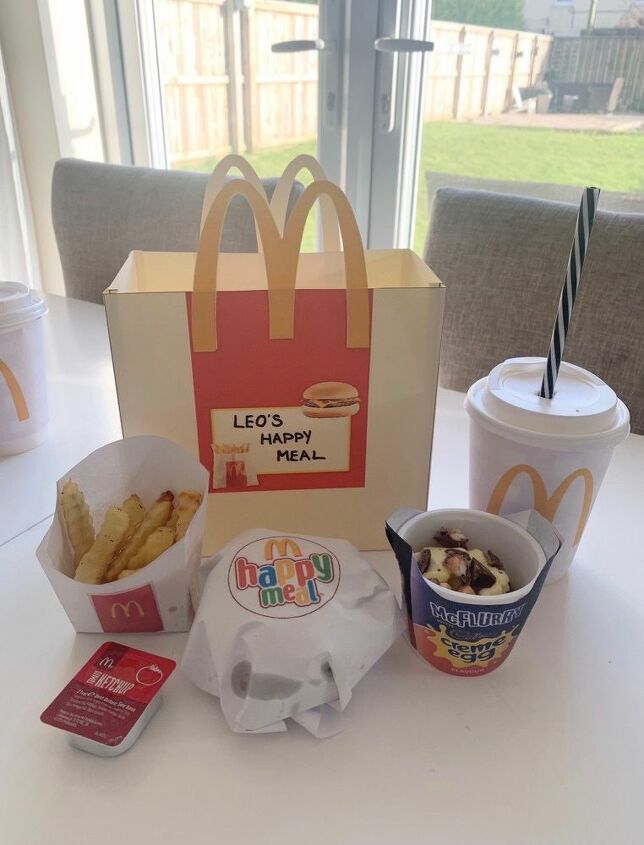
This was the finished result! Happy meal including creme egg McFlurry
To make the happy meal box I did mine using a template that I made up on my laptop and then printed the templates out and then cut them out, but you could just draw them if you don’t have access to a printer. You will need 4 pieces of A4 card per box (1 for the front, 1 for the back, 1 for the sides and 1 for the handles) This is them all cut and ready. I will put all the templates I used at the end of this
To start with you need to fold along all the lines so you have sides that you can piece together. I used a combination of glue (just a prit stick) and some cello tape at the bottom of the box to make sure it was secure. Remember, it doesn't need to be pretty, it’s just for the kids.
Once all the sides of the box are stuck together you can then stick on your handles. I found the glue the best thing for this rather than cello tape. I personalised with my children’s names on each one
The next thing I made was the french fries packet. I just used plain A4 white paper for this. 1 sheet will make you the 2 packets
Just print out the template (or draw it) then cut around the outer shape. Then, like the box, fold along the lines and then stick together. Again, I used a combination of glue and cello tape.
Next was the McFlurry tubs. I had 2 plastic tubs from a ice cream making set that the kids had, but you could use a plastic cup or even just a normal bowl. The template for this one is, admittedly, a bit rubbish (I did say it was a bit rough around the edges) but this was a little more difficult to do a proper template for. So if you’re good at drawing, I think that would be easier. But I made the layout by googling the creme egg McFlurry logo (I chose creme egg as I had creme eggs but you could do any McFlurry you want or even just do a plain ice cream) and pieced it together to make the rough shape I wanted. This then came in 2 parts to tape the tub at the front and back. This was just 1 sheet of A4 paper that did the 2 tubs. It would depend on the size of the tub you have how much paper you would need, my tubs were quite small.
This is my rubbish McFlurry template. Ha. But when it’s all cut out straight and stuck together it actually does the job so I was happy
Next was the cup. I just used a paper coffee cup as I had them in the house and they come with the plastic lid which was ideal. If you didn’t have this style of cup you could always just use a plastic kids cup and then put a piece of paper across the top to put the straw through
I drew a cross with pencil where I wanted to cut the space where the straw would go
Using small scissors I cut across the lines
That’s the template I used which makes the 2 cups from 1 sheet of A4 paper. Again, this would depend on how big your cups are how much paper you would need. I just cut the paper basically in half from landscape to have a logo each And then I wrapped the paper around the cup and I secured with glue and a little bit of cello tape. I forgot to get a close up shot of the cup but you can see it in the finished shot. I just used straws I had in the house
For the burger I just googled the happy meal logo and printed it out onto an A4 sheet of paper. 1 sheet of plain white paper per burger. I Just wrapper it around the burger keeping the logo on the top (I just made basic cheese burgers but you could make whatever your child’s favourite happy meal choice is)
They both had a box each and I luckily had some McDonald’s sauces in the house (we keep ones we don’t use. Ha) This was the contents of each one
This was then the contents inside. They both got a little toy inside. Sadly, not the best toys in the world but trips to shops are limited and mcds toys are usually rubbish too, right?? You wouldn’t even need to do a toy though. You could even put in a page of a colouring book or something
This is the front. Each template is sized for A4
This is the back
This is the sides
This is the handles
I have put an estimated cost below, but it technically didn’t cost me anything as these were all items that I had in the house. I didn’t buy anything specifically to do this.
Both kids were absolutely thrilled and felt like they had had their favourite takeaway and life was a little “normal” again for 10mins.
2 happy kids and 1 happy mum who is seriously craving a quarter pounder with cheese right now! Ha
Enjoyed the project?
Suggested materials:
- Card (Craft store)
- Paper (Craft store)
- Glue (Craft store)
- Cello tape (Craft store)
- Paper cups (eBay)
Comments
Join the conversation
-
-
-
 Thea
on Aug 03, 2020
In time people are going to look back at us and think we were mad for doing projects like this. But right now it makes a lot of sense. Good job!
-
 Our Beautiful Bellway
on Aug 03, 2020
Whatever keeps us smiling I say. Thank you xx
-
-









Frequently asked questions
Have a question about this project?