How to Make a Carrot Swag

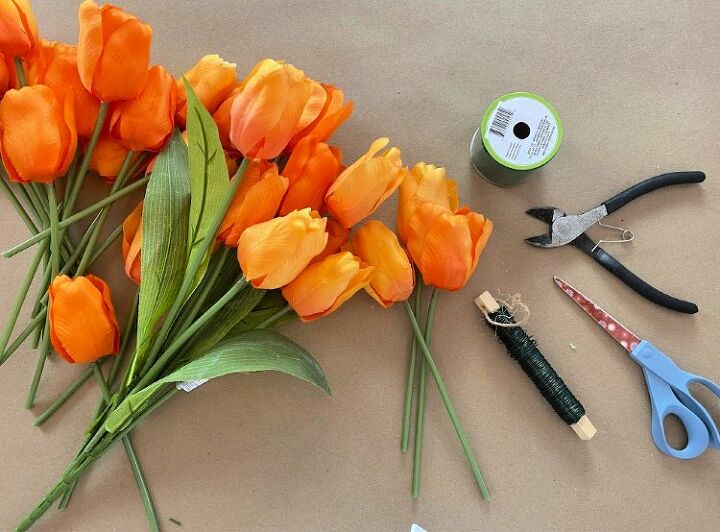
Make a Carrot swag for your front door this spring with just a few simple supplies! Wire, wirecutters, scissors, faux tulips and some ribbon are all you need!
Just 4 bunches of nice faux orange tulips is all you will need to make your carrot door swag. You will want to get large tulips for this project!
Cut each of the individual stems of tulips off from the bunch that it is part of with a pair of wire cutters.
Take three of the tulips and put them together to make the point like the end of a carrot. When you have the tip of your carrot looking like you want, pinch the stems together and take the wire and wire them tightly together.
Now it is time to start growing your carrot. Begin with three more tulips, but don't shape them into quite as much of a point.
Continue adding bunches of tulips to your carrot. Continue adding the bunches of tulips to your carrot. I added 3 bunches of 3, then went to 2 bunches of 4 and finished up with one bunch of 5 for this tulip.
When you are happy with the size of your carrot, it will be looking something like this. There is no need to cut off those additional stems.
I found some artificial asparagus fern I thought looked similar to carrot tops and cut some off until I felt like I had the right amount for my carrot.
Wire the pieces of greenery together and then you will wire them to the top of your carrot.
You will attach the greenery in the opposite direction of the carrots leaving a little space between the carrot and the greens.
This is what the back your your carrot will look like at this point. You can cut some of those stems off if they are too high and stick above your greenery like mine appear to be.
At this point I tied a bow, and secured it with a pipe cleaner. I used the rest of the pipe cleaner to fashion a circle to hang my carrot on a hook.
Your carrot is now ready to hang on a door or a wall and usher in spring!
Enjoyed the project?
Resources for this project:
See all materials
Comments
Join the conversation
-
 Lacey
on Mar 17, 2021
Just got all my supplies can’t wait to get started! What did y’all use for the “green top”? I think I should’ve gone with a fern.
-
 Barbara Conner Herrod
on Mar 21, 2021
In her narrative she says she used artificial asparagus fern.
-
-
-
 Linda Burton Gants
on Mar 21, 2025
Oh, I love this! Such a cute idea! Thank you for sharing! 🌺
-
 Chloe Crabtree
on Mar 22, 2025
Thank you so much! I am glad you liked it!
-
-










Frequently asked questions
Have a question about this project?
Beautiful !!! Cannot wait to make a trip to Michaels !!
This AMAZINGLY cute!!
How many tulips did you use?