DIY Witch Broom
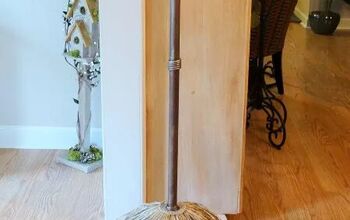
Witches brooms are so fun to decorate with during Halloween, but the price of the more 'attention grabbing' ones is a bit much! Make your own by scouring your backyard!
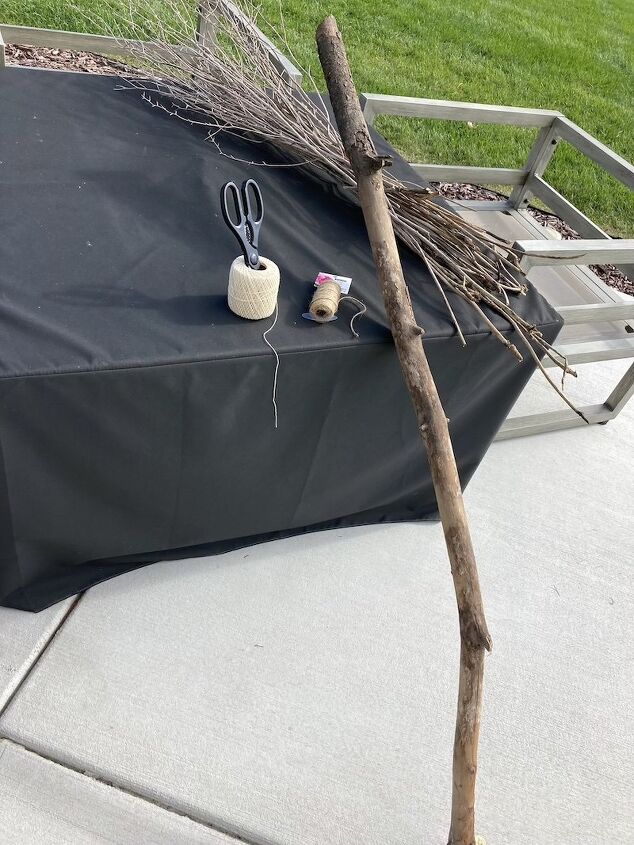
It's time to scour your backyard, a walking path, surrounding woods, etc, to gather your supplies!
You'll need:
- A branch
- Twigs, dried out tall grass of different sizes, wheat, etc.
- Twine or string
- Scissors
- Fishing line (optional-not pictured)
- Command hook or nail (optional-not pictured)
Once you gather everything you need, sort through your twigs/dried out grass, into smaller and larger pieces. This will make it easier to know which pile to choose from, as you assemble.
Start making the 'bristles' of your broom, by working from the center, outward, using pieces from your 'small' pile.
Because I was using actual twigs/dried out findings from my hillside, I wanted to try to make this look as full as possible and thought starting at the center, would help.
Once you start adding a few of your smaller twigs/tall grass/wheat, etc, wrap some twine or string around and tie a knot. Do not cut twine or string-keep attached to the roll.
Continue adding smaller pieces, working in small increments, and wrap around in twine or string.
Keep repeating this and rotating your branch, until you feel that the center of your 'bristles' is full enough.
Now that you have your center filled using your smaller twigs, dried out grass/wheat, etc., it is time to move on to the outside of the 'bristles'.
You will now be grabbing from your larger/longer pieces and adding them a few at a time to the "outside". Wrap the twine or string around, and continue adding more.
Once you have quite a bit of the outside 'bristles' on, you can add some pieces at an angle. This will give it more width/dimension, than just having straight, parallel pieces.
After placing 2-3 twigs, wrap around with twine or string a few times to help secure those pieces well.
Continue doing this where you think yours needs it.
Once you are done adding all the angle pieces you want/need, wrap a large band of twine or string around to securely hold them all in place. Tie a knot.
If you want an extra hold and make sure your 'bristles' are securely in place, you can add a second band of twine or string.
Break off any excess length from your twigs/dried grass/wheat pieces. Since they are so dried out, they should break off pretty easily!
This step is optional! If you are needing any extra security to hold your broom in place, you can wrap your branch with some fishing line and secure it to a command hook or nail.
You may even hang your fun broom so it appears to be floating! You would need strong trim nails or a few large command hooks.
The best part is displaying it for all to see!
DIY Halloween decorations
Enjoyed the project?
Resources for this project:
See all materialsComments
Join the conversation
-
 Katen
on Oct 17, 2023
Great idea. Can’t complain about cost and customizable size wise. May I suggest if you have birds that want to nest in front door wreaths (I have year round). Douse with Peppermint oil. Birds don’t seem to like and smells Christmasy at Christmas when guests enter home. I’d decorate for each season and use as a backdrop for other creations but keep up with peppermint oil. I have real problem with birds nesting around here
-
-
 Katen
on Oct 17, 2023
Paige. Been battling for past five years. Countless birds in house (they aren’t called dirty birds for nothing; bird dirt everywhere)). Found peppermint oil suggestion last year I put full strength in spray bottle and spray freely. One year with good results and agreeable smell
-













Frequently asked questions
Have a question about this project?