How to Clean Your Garbage Disposal and Get It Smelling Fresh Again

By Marilyn Syarto
Maybe you notice a slow-draining kitchen sink, but it’s usually that smell that makes you remember that you have to clean your garbage disposal. Learning how to clean a garbage disposal, and when, will let you enjoy your kitchen while getting rid of bits of food in a more efficient way and without the worry of odor.
Our guide gives you the best—and most natural—ways to clean your garbage disposal with minimal elbow grease.
Photo via Chelsea @ Making Manzanita
Why You Should Clean Your Garbage Disposal
Like all appliances that hold moisture, a garbage disposal runs the risk of breeding mold or bacteria in that wet, dark drain. Although most of the waste that runs through a garbage disposal is disposed of, some gunk may build up on the sides of the drain and in the grinding space and slowly begin to rot. In extreme cases, this build-up can affect the efficiency of your drain.
When to Clean Your Garbage Disposal
You know it’s time to clean your garbage disposal when you smell a foul odor. This should alert you to clean your disposal immediately, as you want to address the issue before finding yourself with a blockage or a backup of bits of food and water. If water does back up into your sink, it’s likely that you may be overusing your disposal or there’s a blockage, according to ABC Home & Commercial Services in Dallas, Texas.
If you use your garbage disposal daily, you can avoid mold, mildew, and rotting food build-up by cleaning it once every week. However, if you only run your unit a few times a week, you can get away with cleaning it once every two weeks to once a month.
Chemical Drain Cleaners
How to Clean the Garbage Disposal Splash Guard
It’s a quick process to clean the splash guard, or the flappy rubber gasket that lines the mouth of your garbage disposal. The splash guard can quickly become disgusting, and it’s where most of the odor is probably coming from. Clean the splash guard in between deeper garbage disposal cleanings by taking these fast steps.
Tools and Materials Needed:
- ½ cup baking soda
- ½ cup white vinegar
- Old toothbrush
- Sealable plastic bag
- Protective gloves
Step 1: Unplug the Unit
For safety’s sake, unplug your unit even if you are only cleaning the splash guard. If the disposal is hardwired to the home, shut off the circuit breaker that controls it.
Step 2: Apply Baking Soda
Pour the baking soda on and under the flange.
Step 3: Add Vinegar
Pour the vinegar on and under the flange. It will start to bubble and attack bacteria.
Step 4: Scrub
Use an old toothbrush to scrub the splash guard clean. (Throw out the toothbrush in a sealed plastic bag so you don’t spread any mold that may have been on the guard.)
Step 5: Rinse and Plug In
Rinse the splash guard with cold water. Plug the unit back in or switch the breaker back on.
Photo via Katelyn Fagan
How to Clean a Garbage Disposal With Ice Cubes and Baking Soda
Ice cubes can break up build-up in the disposal, baking soda and vinegar disinfect the drain, and the salt’s abrasiveness helps scrub the unit clean, too. Take these quick steps to clean that garbage disposal right up.
Tools and Materials Needed:
- Flashlight
- Long tongs or long needle-nose pliers
- Protective gloves
- Ice cubes
- ½ cup of kosher or rock salt
- 1 cup white vinegar
- ½ cup baking soda
- Small bowl
- Old toothbrush
- Sink stopper
- 1 teaspoon of liquid dish soap
Step 1: Cut Power to the Disposal
Unplug the unit and then add an extra step of cutting the power circuit to the garbage disposal.
Step 2: Remove Obvious Clogs
With a flashlight, look into the drain to see if there are large foreign items you can safely remove using long thongs or long needle-nose pliers. Do not put your hands into the drain or unit.
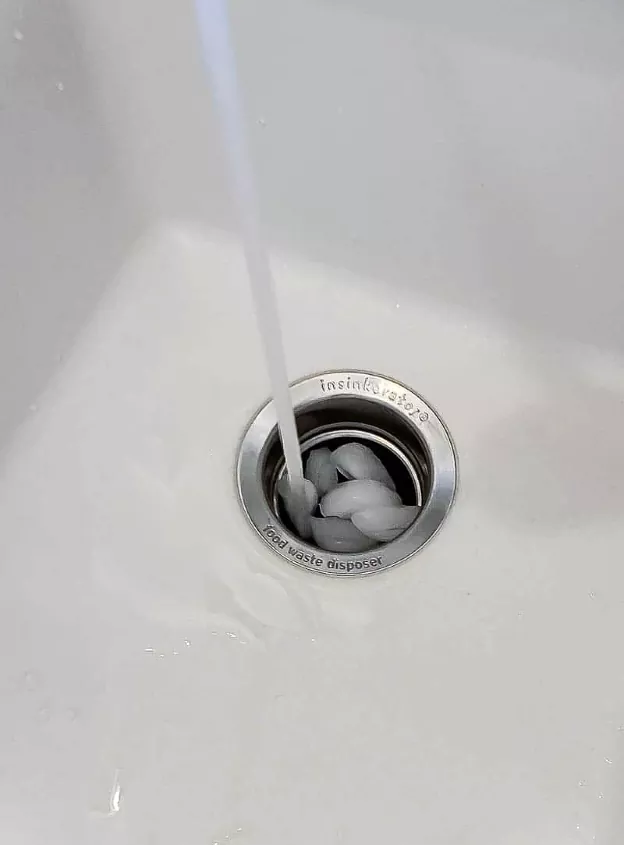
Step 3: Add Ice and Salt
Fill the disposal with as many ice cubes as you can until it is filled followed by ½ cup of salt on top.
Step 4: Restore Power
Restore the power to the garbage disposal. Turn on the garbage disposal and turn on the faucet so cold water runs down the disposal. Keep the garbage disposal on until the ice and salt are completely gone.
Step 5: Add Vinegar and Baking Soda
Next, pour a cup of white vinegar and a ½ cup of baking soda into the disposal. Let fizz for about 15 minutes. (You can also make vinegar ice cubes for extra scrubbing action.)
Step 6: Cut Power
Cut the power from the garbage disposal again if you want to clean the splash guard.
Step 7: Clean the Splash Guard
While the fizzing action continues and the power to the unit is cut, mix a bit of baking soda and vinegar in a bowl to create a paste. Dip an old toothbrush in the paste and scrub the rubber splash guard.
Step 8: Restore Power
Return power to the unit to finish cleaning.
Step 9: Plug the Sink
Put the stopper in the drain and fill the sink with cold water and a teaspoon of dish soap until the basin is half full.
Step 10: Remove Plug
Take the plug out of the drain, turn on the disposal, and let the soapy water run through the unit.
How to Deep Clean a Garbage Disposal
This method takes a bit more elbow grease than the other methods because you need to scrub the walls of the drain and garbage disposal. Use this method if there’s been heavier-than-usual use of the garbage disposal where more build-up may occur on the unit’s walls. Keep in mind that you should never stick your hands in the drain or garbage disposal unit—let a long-handled scrub brush do the job.
Tools and Materials Needed:
- Flashlight
- Long tongs or long-nosed pliers
- Protective gloves
- Sink drain stopper
- Long-handled scrub brush
- Toothbrush (optional)
- Grease-dissolving liquid dish detergent
- 2 cups ice cubes
- 1 cup of kosher or rock salt (do not use table salt)
Step 1: Disconnect Power From the Unit
Unplug the garbage disposal from its power source. Flip the circuit breaker to the kitchen or the unit if it has its own breaker. Check to see if power has been successfully cut to the unit by turning it on before moving onto Step 2.
Step 2: Remove Obvious Blockages
Look into the drain with a flashlight. Remove any obvious and clear objects using long tongs or long-nosed pliers, but never put your hands into the unit.
Step 3: Reconnect Power
After connecting the power to the unit, plug the sink with a stopper and fill it halfway full with hot water. Pull the plug from the drain, turn on the unit, and flush the hot water through.
Step 4: Turn Off and Disconnect Power Again
Disconnect the power to the garbage disposal unit again.
Step 5: Scrub the Drain
Wet the head of a long-handled scrub brush that will fit into the drain with water and grease-dissolving liquid dish detergent. Scrub the brush around all the interior surfaces and under the splash guard of the unit. If preferred, use a toothbrush for the splash guard for better control.
Step 6: Flush the Unit
Re-connect the power to the unit. Plug your sink with a stopper, fill the sink halfway with hot water, turn on the unit, and unplug the sink to flush it out again.
Step 7: Add Ice and Salt
Pour two cups of ice and one cup of salt into your disposal. Turn on the unit and let cold water run from the faucet as the ice and salt grind.
Photo via Chelsea @ Making Manzanita
How to Unclog a Garbage Disposal
If you have a clog in your garbage disposal, there are safe ways to potentially remove stuck debris without ever sticking anything down the drain or needing to remove the trap or pipe.
Try these steps to unclog your garbage disposal, but if they don’t work it probably means the drain trap and discharge pipe need to be removed, which is best and safely handled by a plumber, says Reeves Family Plumbing in Dallas, Texas.
Even if you’re tempted to remove a clog you are “certain” you can reach, do not attempt it with your hands. Down that deep, dark hole of your garbage disposal are insanely sharp blades.
Tools and Materials Needed:
- Allen wrench that comes with your unit
- Long-handled tongs
Step 1: Use the Reset Button
If your garbage disposal is overfilled or clogged, the overload protector may have been tripped. If an obstruction is clearly sticking up right near the surface of the drain and you can simply pull it out with long tongs, remove it, press the reset button (consult your user’s manual for the location, or if you installed the garbage disposal unit yourself, you may be familiar with the buttons), turn on the water, and turn on the disposal to see if it works.
Step 2: Turn the Power Off
If the reset button did not work, you’ll need to take a few more steps to further dislodge a clog. Before attempting to unclog your unit, disconnect the power to the disposal by unplugging the unit and/or turning off its circuit breaker.
Step 3: Find the Allen Wrench
Most disposals have a wrench attached to the outside bottom of the unit under the sink, and a hole beneath the unit that the wrench fits into. Stick the wrench into the hole and wiggle the wrench back and forth to move the disposal’s blades to loosen the clog.
Step 4: Turn Power Back On
Remove the wrench from the hole and turn the power back on and see if the disposal works. If you don’t hear the motor, hit the reset button again. If this did not work, either, it’s time to call a plumber.
How to Keep Your Garbage Disposal Clean
Here are dos and don’ts to help you keep your garbage disposal clean and in good working order:
- Do put fine fish and chicken bones down the disposal because they can literally scrape the walls clean.
- Do occasionally toss a handful of ice cubes with some citrus peels into your disposal. The orange or lemon peels won’t necessarily clean your unit, but they will freshen up the disposal.
- Do pour a few drops of liquid dishwashing soap inside the drain, then run the garbage disposal for a minute with cold water after washing dishes. The dish soap will help lift grease that may be tacked onto the sides of the disposal.
- Do grind up just one cup of food scraps or less at a time—nothing more or it may overload the system.
- Do use cold water when running the unit. Cold water will solidify any wayward grease or fat so it can then be chopped up in the disposal grinder. Hot water can actually help grease and fat build-up in your unit.
- Don’t put any food down the drain that’s larger than a golf ball.
- Don’t put starchy foods that turn pasty when chopped up down the disposal, such as potatoes or bananas. These foods will gum up blades.
- Don’t dispose of fibrous food that can wrap around the blades, such as asparagus, corn husks, or celery.
- Don’t dispose of pasta and rice, which can expand and clog your unit.
- Don’t put grease and fat down the drain. These can coat the drain and cause all types of odors and clogs.
- Don’t put larger bones (such as beef or pork), plastic, pits, or tough seeds into the disposal, which can break the blades.
Always Run Your Disposal
Do you have an unusual tip for cleaning a stinky garbage disposal? Let us know below, we want to hear!
Enjoyed the project?
Comments
Join the conversation
-
 Mal101709202
on Apr 28, 2024
Uh, most disposals don't have blades at the bottom. They work by pushing food scraps to the sides, where they are grated into tiny pieces and flushed away in the drain. As long as the disposal is not running, it is perfectly safe to put one's hand into the disposal and clear out any food that hasn't been washed away. Food particles also can accumulate under the top rim and be easily removed why running a finger under the rim. It isn't necessary to turn the circuit breaker off. It isn't necessary to use anything other than a good detergent with grease-cutting properties. I would be surprised to learn that the author knows what the inside of a garbage disposal looks like.
-










Frequently asked questions
Have a question about this project?