WINE RACK (Wall Hanging)

I designed a piece of laminated plywood wine rack hang on the wall.
It is 110x20x14 centimeters and it is made with 18 mm poplar plywood and 12 mm birch plywood.
I designed the bottle hole to fit in the standard wine bottle of 750 ml capacity.
It will take some time but it'll be worth it!
FIRST STEP:
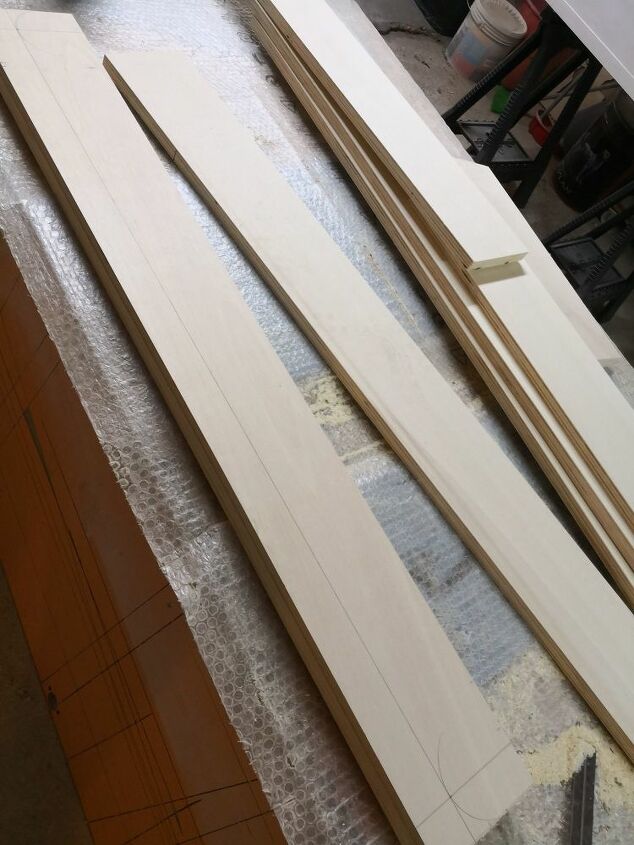
- cut at the size 10 pieces of poplar ply at 110x13 cm
- cut 2 pieces of birch plywood at 110x14 cm (ATTENTION birch ply is 1 centimeters much wide than the popolar ply pieces)
SECOND STEP
- make 10 mm mdf template of 91 mm , feel free to make it adapted to you cutting bit size lika the drum saw bit and obviously bigger than the bottle you're going to put in. (take your time to make it perfect rounded and smooth because it guides all the next working process)
- you can screw a piece of sacrificial fence on the template just to be sure you're going to draw the hole line on the ply template at the same distance from the side of the pieces and you can move it up and down without changing the positions of each hole from the sides
THIRD STEP
- draw over the first piece of poplar ply the template made with mdf and take care to design it well and be sure it is symmetrically drawn and every bottle hole is at seme distance from the previous and next
FOURTH STEP
- cut down with the jigsaw the inside home material paying attention to stay inside the hole with the blade and near the circle line as possible you can ( take your time on that because this piece is going to be the main template of the final piece; every imperfection on this piece we're going to bring over every next piece thantake the time you need to make the cut perfectly as possible)
- the reason why to stay near the line as possible, is because we have to work with the plunge router and copying bit with bearing,so less material router has to export, less it will be strained the bit and then it will be last shaped for much time
FIFTH STEP
- take the plunge router with trim bit and after have screwed the mdf template on the ply piece , shape the ply hole identically with mdf template
- don't worry about screw holes because are going to be covered with other pieces and we don't need anymore the mdf template
SIXTH STEP
- after have worked with the router each bottle hole we have the main template of the final piece and from it ,starts the laminating process.
SEVENTH STEP
- take the main template and draw hole lines on every left pieces of plywood cut in the first step and repeat the work done in the fourth step with the jigsaw for every pieces
EIGHTH STEP
- start glueing two by two pieces on the main template we have created in the sixth step
- put the glue and you can simply align the piece on the main template to be sure it is on the corrispondent position and clamp it (if you want put some finishing nail to keep stopped during clamping time)
- after glue dry , reaping the main template glued with other two pieces, use the plunge router with bottom bearing copying bit to bring the shape of central main template on the two new pieces glued
- repeat the process glueing other pieces two by two lefting the 2 pieces of birch plywood af last step (these are going to be the external faces of the wine rack)
NINETH STEP
- reached last two pieces of birch ply you have the whole structure built and start sanding it down
SAND.....SAND.....SAND DOWN
Sand down the internal part with drum sand paper bit mounted on power drill
SANDED DOWN
TENTH STEP
- after sanding down to 220 grit, i've put two coat of polishing walnut wax and let it dry for a night
- To attach it on the wall i've used two pieces of metal bar ,that one used also to attach the kitchen cabinet on the wall
- at this point you can understand why i've used last 2 pieces of laminating process , birch ply and also because they are 1 centimeter wider than the other pieces of plywood
- birch ply is a long way better to finish with wood finishing products, it is more hard than poplar and gives a kind of quality sensation to the piece
ELEVENTH STEP
- birch ply 1 cm wider than poplar makes possible to create a secret chamber behind the structure to hide the metal gear used to hang it on the wall so we can se the external side trimmed perfectly against the wall with no gaps
LAST STEP
- put bottles on that and start drinking....cheers


I've realized this piece with simple power tools ,i've not used pro tools so i'm sure that you could replicate it with your personal spec as colours and sizing just putting patience and passion 
 PLEASE CHECK DOWN BELOW THE LINK ON MY INSTAGRAM PROFILE WHERE YOU COULD FINE OTHER PHOTOS OF THE FINAL PIECES HANG ON THE WALL AND ALSO SOME OTHER OF MY PROJECT AND MAYBE FOLLOW ME IF YOU'RE PLEASED TO ....THANKS TO EVERYBODY
VCRAFT CUSTOM CREATION
Enjoyed the project?
Resources for this project:
See all materialsComments
Join the conversation
-
 Robyn Garner
on Feb 16, 2019
Your creation is absolutely enthralling! I am very impressed!
I also appreciate how much effort you clearly put into your post - it seems that English is not your first language. I was able to understand all that you did. It's also amazing that you made that piece of functional art using pretty basic tools that even I have lol! 😎👍😍
If you truly want this sold in stores, just commit to spending as much time and effort researching how to present new items to furniture and homegoods stores. Take some EXCELLENT, staged photographs of it and figure out how much you're willing to sell them for, knowing the stores want to be able to mark it up from 50-100% to make their money.
This finished technique is actually so intriguing and beautiful that I would encourage you to do 2 things:
First, scale it up! Make tables at least and start learning how to make chairs.
Second, experiment with creating edges that are more sculptural, just to see what happens. Could you, for instance, carve a Victorian Deco style profile into a table leg? Imagine how gorgeous and unique that would be!
btw....when you get your 3rd order for a table, please let me know. That would be when I get my "discoverer's fee"!
Not kidding, dear! Before I was disabled I was a Business Consultant.
Let me know when we can discuss my wish item from you on sale #3!
🙃 💏 🕉 🎨 🤗
- See 1 previous
-
 Vcraftcustomcreations
on Feb 17, 2019
Hi Robyn, thanks a lot for your compliments and thoughts. I want to take them as a challenge cues and I will get through this thing and see what happens. Please if you want to DM me on Instagram of Facebook, we can share some thoughts about some questions, and hope you'll be wished to answer me and giving me some advices. Thanks ✌️👍☺️
-
 Robyn Garner
on Feb 17, 2019
Oh I am wriggling in my chair that you will take this on as a challenge! 🤗
JUST what I was hoping you would do! I'd love to banter with you on things but I don't do fb or instagram. You can email me at YyaskY@protonmail.com
I look forward to hearing from you! 😎
-
-








Frequently asked questions
Have a question about this project?
What a great wood shop project this would make. Is there still wood shop in HS ?
I like your wine shelf......very much.....just 1 little question? Did you make the shelves for all small bottles? My husband buys me a large bottle of blackberry wine and it is in a Large bottle. I was just wondering. Terrific job!!!
What a great project! Thank you for the great instructions. What type of metal hinges are you using to hang this?
thank you!