How to Create a Chic Side Table | Easy Clothes Hanger Crafts

Got some old wooden hangers lying around? Don't throw them away just yet!
Today, I'll show you how to transform those hangers and a simple pizza pan into a stunning hanger table.
This clothes hanger crafts project is fun and easy and gives you a unique piece you can use as a side table or a plant stand.
Let's jump right in!
This post was transcribed by a member of the Hometalk editorial team from the original HometalkTV episode.
Tools and Materials:
- Pizza pan
- Wooden hangers
- Hacksaw with a metal blade
- Screwdriver
- Small metal L brackets (4)
- Drill with a very small drill bit
- Short screws
- Pencil
Hometalk may receive a small affiliate commission from purchases made via Amazon links in this article but at no cost to you.
Table of contents
1. Prepare the Hangers
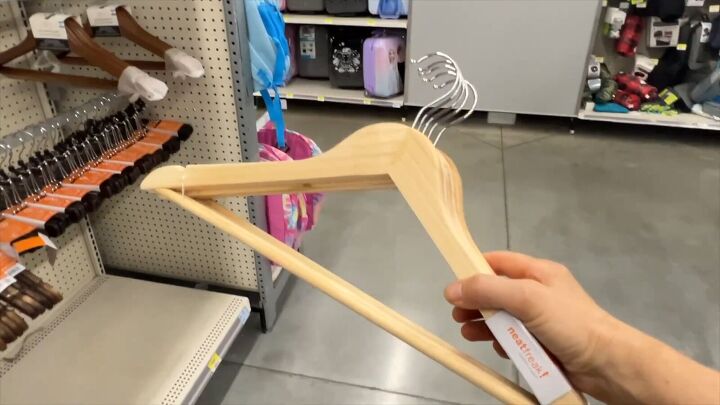
Grab some wooden hangers from the Dollar Store.
Use a hacksaw with a metal blade to score the metal hanger close to the wood.
Snap the metal part off carefully.
Then, remove the wooden bars along the bottom of the hangers by pulling them apart using a screwdriver.
You should be left with 4 pieces that look like the above.
2. Attach the L Brackets
Grab a handful of metal L brackets.
To join 2 hangers together, position a small metal L bracket off-center to the middle of the hanger with the L shape facing inward.
To avoid splitting the wood, drill a shallow pilot hole with a very small drill bit.
Position the bracket in place and use short screws to secure it to the hanger.
Now, take a second hanger, place it perpendicular to the first, and mark the spot to drill the next hole.
Drill a pilot hole into the second hanger
Attach it to the first hanger using a screwdriver.
Repeat the process with your other two hangers.
3. Assemble the Table Base
Flip the hangers over so the tips are sitting on the table.
Now, let's join these sets together using more L brackets.
The key here is to align the brackets on each set correctly. This time, attach the brackets, off center, to the other half of the hanger tops so you don't run into the previous screws.
Pencil in pilot holes, drill them out, and attach another L bracket positioned so the part sticking up can connect to the other hanger set.
Repeat this process on the second set of hangers.
Now, let's attach these two parts. Position them together, mark the pilot holes with a pencil, and drill them out.
Finally, align the pilot holes over the L brackets and use screws to join the pieces together.
Once all hanger sets are connected, slightly adjust them to ensure they can support the pizza pan on top.
4. Attach the Pizza Pan
Now, get your pizza pan!
Place the pizza pan on the wooden base, matching the pan holes to the center of the leg tops.
Pre-drill pilot holes into all four hanger tops.
Secure the pizza pan to the legs with screws.
The piece can be used with just the pizza pan top, turning it into a plant stand.
Another option is to add a wooden round and use it as a side table.
More Uses for Hangers!
Clothes Hanger Crafts: DIY a Unique Side Table
And there you have it—a versatile piece that can be used as a diy side table or even a plant stand.
I hope this project inspires you to try out more clothes hanger crafts and see what other creative and functional items you can make.
This hanger table is a perfect addition to any room, offering both style and utility.
Enjoyed the project?














Frequently asked questions
Have a question about this project?