How to Make a DIY Cardboard Couch in a Chic Round Style

Today I’m going to show you how to make a couch out of… cardboard! Really, the only thing you need to make this comfortable couch is cardboard. A lot of cardboard! Not only that, but the couch will be curved.
Is it really possible to DIY a round cardboard couch? Yes, and you can apply this technique to any piece of furniture or home decor. Let me show you how.
Tools and materials:
- Cardboard
- Electric scissors
- Measuring tape
- Marker
- Scotch tape
- Glue
- Hot glue gun
- Paper towels
- Foam
- Fabric
1. Measure and draw
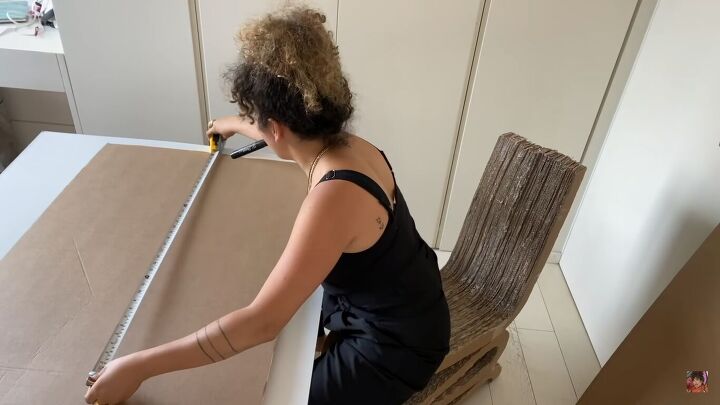
I wanted to make sure my couch would fit the corner of my room and also fit three people. So, I went for a length of 1.3m (4.25 feet). Remember, everything you see me do here can be adjusted to what you need.
I drew the rounded shape of the couch freehand and measured 7cm (2.75 inches) for the depth of the seat.
I want the seat and the back of the couch to be one entire piece, so I’m sure that it’s never going to pull off when you put pressure on it.
That’s why I’m going to draw out the bottom shape, then all the connection pieces are going to be one piece, bottom and top.
I drew vertical lines every 6cm (2.36 inches) and wrote down how long each line was for reference.
2. Cut out the base
Cut out the shape you need, sticking pieces of cardboard together if you need to.
3. Create the connection pieces
We have the base, but we still need to factor in the height. I want the height to be 40cm (15.75 inches)for the seat and 65cm (25.6 inches) for the back.
So, I am cutting out pieces of cardboard that are the length of the vertical lines I drew by the height e.g. 35cm x 40cm (13.75 x 15.75 inches). Where the lines meet the back of the couch, I adjusted the height to 65cm (25.6 inches).
I cut out these shapes 3 times for each line, which I will stick together to make the couch more stable. I labeled them by letter so that I know the order in which they go.
Don’t forget that the end of the couch has no back.
4. Glue the pieces together
Next, glue the three matching connection pieces together for each section, back to back. Glue together three layers for the base as well.
You might want to put something heavy on the pieces while they dry, to ensure they really stick well together. I taped the layers together for extra support.
5. Glue the connection pieces to the base
Next, use a hot glue gun to glue the connection pieces to the base. I also cut small pieces of cardboard to place between them for extra support.
I dare you to tell me that this is not the coolest thing you’ve ever seen!
6. Create the exterior
Next, I’m wrapping cardboard around the couch and hot gluing it in place along the edges. I’m also using tape to ensure the glue dries in the correct position.
7. Bend the top
For the curved edge, I cut along the top and then bent the cardboard over the back, taping and gluing it in place, to get the shape I needed.
Here’s what it looks like so far. You can see it is completely stable. All we have to do is put foam and fabric on top!
8. Cover the couch with foam
Comfort is key, so I took foam that is 2cm deep (0.8 inches) and glued it to the couch.
9. Add a layer of glue and paper towels
In order to effectively staple the fabric to the couch, I needed a rock-hard surface, so here’s a little hack I learned. Add a couple of layers of paper towels and glue to the surface of the cardboard. This will dry super hard and make the upholstering easier.
10. Attach the fabric to the cardboard
Now you can staple your fabric to the cardboard. Cover the back of the couch this way.
For the seat, I added a base layer of cardboard first in the shape of the couch, then added foam before stapling the fabric. Make little cuts and folds to get an even curved shape.
For the side of the couch, I cut out two rectangular pieces of cardboard to the correct heights (40cm and 65cm - 15.75 inches and 25.6 inches) to wrap around. I attached fabric to them using hot glue, which works better for straight lines.
Then, I hot-glued them to the sides, which covers up all the staples at the back too.
How to make a cardboard couch
Here’s the final result! I’m so pleased with how this turned out. I made a trendy round couch for just pennies! I also used far less cardboard than I thought I would, so I have enough left over for a second project.
What do you think of this project and what piece of furniture do you think I should make next? Let me know in the comment below.
Enjoyed the project?
Resources for this project:
See all materialsComments
Join the conversation
-
 Ste104672299
on Jan 21, 2025
I absolutely loved this. It is a great idea! Often, a couch or other furniture is needed for our local theatre group. If we could make these props, they would not take up theatre space after we no longer needed them.
-
-
 Eve139605121
on Feb 16, 2025
That's really awesome 😎 I'm going to try to make a small chair for my grandson. Sounds like a plan a smart one. Great job! 👍🏼
-










Frequently asked questions
Have a question about this project?
i am 1000% inspired! All the cardboard boxes that I get delivered to my house from that online stores. I could build enough furniture for my whole house. One small problem. How much cardboard did you use, fabric, foam?????
What about a chair next to match the couch?
IS THIS REALLY STABLE? WE'RE SENIOR CITIZENS AND DISABLED SO I REALLY NEED TO KNOW!