Old Chipboard Armoire is Totally Transformed!

I'm a big believer that ANYTHING has the potential to be dramatically updated...and that ANYONE can do it!
When it came to this cruddy old armoire I had a crazy idea and just decided to run with it! I'm so pleased with how it turned out and hope it helps inspire.
I've summarised this tutorial slightly for Home Talk. You can find the full how-to here on my blog.
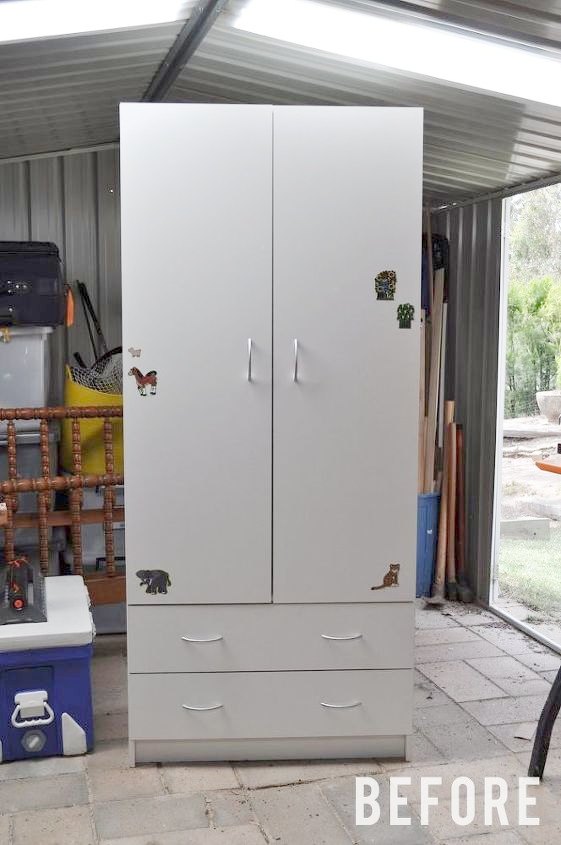
I started with this super basic chipboard armoire which I picked-up second-hand for just $50.
Granted, it's not the most attractive specimen in the world though I wanted something sturdy with simple lines so it fit the bill perfectly.
My first step was to cut off the toe-kick then attach slightly over-hanging sheets of plywood to both the top and base.
This isn't necessary though I wanted a more custom look and like the way it helps frame the doors and drawers.
In addition, I created a new pine feet frame in a mid-century modern style.
Again, this isn't necessary and whilst it wasn't overly difficult it was probably the trickiest aspect of the project. For ease you could simply use off-the-shelf feet instead.
For a more luxe look I gave the whole exterior of the armoire a few coats of black satin paint.
Next was the fun bit...attaching the hexagons!
Now, if you're cringing at the thought of trimming 300 perfect hexagons by hand, never fear! Ready-to-go laser cut plywood shapes can be bought from lots of places. Because I needed sooooo many I found my cheapest option by far was to purchase wholesale through Alibaba (you can find further product information over on my blog - link at the end of this article).
The hexagons were raw so I used a variety of wood stains to tint them different shades. It sounds time-consuming though was actually pretty quick and very simple. Almost therapeutic!
Once my hexagons were dry I began attaching them to the armoire.
Determining how the over-all pattern would work took a bit of figuring though once I got started it was just a matter of gluing and clamping, gluing and clamping, until everything was covered.
Once the glue was fully set, I used a jigsaw to trim off any over-hanging hexagons before sanding everything nice and flush.
To finish I sealed the hexagons with several coats of Danish Oil.
This gives them a lovely lustre, enriches and protects the wood and also helps to "lock" everything in place.
Finished!
It's like a whole new piece!
Thanks so much for reading. I hope you like it!
Visit my blog post here for the full how to, further photos and all of the product source info.
Enjoyed the project?
Resources for this project:
See all materials
Comments
Join the conversation
-
 Eas87571672
on Aug 17, 2023
I love, LOVE, LOVE THIS PIECE!!! ♥️♥️ You did a fabulous job!! Just amazing!! I would love this piece in my home…go, YOU! 😁
-
-










Frequently asked questions
Have a question about this project?
Holy HEXAGON! Fabulous job. How many Hexagons were used?
Did you do anything with the inside? I'm thinking simply more of the black paint would do it for me.
Love this. How did you get the seams between doors and drawers to match up so well?